Archive | March, 2013

Easter TWEETINGS… from *gemsfoodgems*

31 Mar
Happy Easter... tweet tweet!

Happy Easter… tweet tweet!

March has been a great month here at ‘gemsfoodgems‘.  I have had a major HIGH in views and people loving the recipes.  It’s also Easter time, which has allowed me to indulge in a ‘few of my favourite things’ <singing, as per sound of music>; including:

which overall has made me very very happy.  So thank you for tuning in.

I hope you all have a very merry Easter.

LOVE GEMSFOODGEMS x

HOT CROSS BUNS… with a *CRANBERRY* surprise… {mixing it up}

29 Mar

IMG_4724[1]For the last week I have been pondering what to do with my next batch of HOT CROSS BUNS to make them different from my last batch and to deliver something to you (… my friendly audience) that will be a treat, something extraordinary.

My inspiration came when I was treated to the ‘BOSTON BROWNIE’ from Konditor & Cook in Borough Market.  It was a true taste sensation – so much so, that I (gemsfoodgems@twitter) had to tweet a thank you!

The secret, making these brownies a real taste sensation was the addition of cranberries.  Yes, seriously – little explosions of fruit flavour in the middle of a heavenly, luxurious, chocolate brownie.  My brain started whirring and I thought… cranberry, orange zest… in my hot cross buns… THAT’S IT.

Without further ado, I present to you my CRANBERRY & ORANGE HOT CROSS BUNS.

PREPARATION TIME: 2 hours (including the proving time and time to make the shortcrust pastry)

COOKING TIME: 20 minutes

MAKES: 12 Cranberry & Orange Hot Cross Buns

INGREDIENTS:

For the Bread Buns

  • 250g strong white bread flour
  • 250g strong wholemeal bread flour
  • 60g light brown muscavado sugar
  • 1 x 7g sachet fast-action dried yeast
  • 1/2 tsp salt
  • 1 tsp mixed spices
  • 1 tsp cinnamon
  • 1/2 teaspoon nutmeg
  • zest of 1 large orange
  • 140ml luke-warm semi-skimmed milk
  • 130ml luke-warm water
  • 60g butter (melted and cooled slightly)
  • 1 large free-range egg (approx. 90g)
  • 100g raisins or currants (without seeds)
  • 60g dried cranberries

Shortcrust Pastry

  • 30g plain flour
  • 15g butter
  • water (cold, enough to bind together)

Sugar Glaze

  •  2 tbsp caster sugar
  • 2 tbsp water

HOW TO MAKE YOUR EASTER TREATS…

To make the bread buns…IMG_4725[1]

♥ Sift the flour into a large bowl, stir in  the sugar, yeast, salt, mixed spice, cinnamon and nutmeg, and make a well in  the middle.

♥ Mix together the warm milk and water and add to the bowl with the melted and cooled butter, together with the whisked egg.

♥ Mix to a soft dough using a metal spoon.

♥ Knead the dough on a  lightly floured surface until smooth and elastic.  You will know when it is ready when the dough ‘springs back’, so shape into a ball, gently push your finger in about 1/2 a cm, then take it out – if the dough ‘springs back’ it is well kneaded – if not knead some more!IMG_4726[1]

♥ Shape the dough into a round and then place in a large bowl.  Cover with a clean tea towel and leave to rise in a warm  place for 1-1½ hours or until the dough has doubled in size.

♥ Remove the dough from the bowl and ‘knock back’ using your fists – this removes all the air.

♥ Knead the dough on a lightly floured surface for 2-3 minutes  until smooth and elastic once again.

♥ Now add the orange zest, currants and the dried cranberries and knead for a minute until all the fruit is mixed into the dough.

♥  Divide the dough into 12 pieces and shape into small  rolls.

♥ Perfect bun, now lets make the shortcrust pastry crosses!

To make the crosses…buns 3

I would make the shortcrust pastry whilst the dough proves.  Then you can wrap it in cling-film and keep it in the fridge until you need to use it.

Then…

♥ Roll out the shortcrust pastry to 5mm narrow strips – as you have 12 buns you are going to need 24 strands.

♥ Place one strip across the top of one of the bus, then place the other across this, to make a cross.  Press down lightly and if required, secure  with a little water and a pastry brush.  If you want to go a little crazy (like me) you could make some ‘shapes’ and place these on top – I have (as you can see) created little love hearts…buns6

♥ Lightly oil 2 baking trays, arrange the buns on the  trays and cover with oiled cling-film.

♥ Leave to rise in a warm place for 30  minutes or until doubled in size. Remove cling-film – it’s time to bake the buns!

♥ Bake buns in a  preheated oven at 220 degrees C / Gas Mark 6 for 20 minutes (or until golden brown).

♥ Transfer the buns to a wire rack.

To make the glaze…

♥ Heat the sugar and water in a pan, until the sugar dissolves.  Do not let the sugar/water burn or begin to caramelise.  Make this whilst the buns cook.

♥  When you take the buns out of the oven and place them on the wire rack, you can brush them with the glaze and then serve warm or cold.

♥ If you let them cool, you can slice in half the next morning, toast and serve with a little butter!  YUM!

Baked, glazed and ready to eat! MARVELLOUS!

Baked, glazed and ready to eat! MARVELLOUS!

STORAGE:

The sugar glaze on these buns can make them go quite soggy, quite quickly and as they are fresh, with no preservatives the inside of the homemade hot cross bun can begin to go stale/dry quite quickly.  So, eat one or two fresh and store 2 or 3 in a large cake tin.  With the rest, chop them in half, put them in freezer bags and place them in the freezer for another day.

You know the days where its hard to get out of bed and there has to be something super special to make you get up and give you the start your day need.  I think these may just be that ‘kick start’.

HAPPY EASTER!

WARNING: This recipe is NAUGHTY, but BOY they taste good… *MARS BAR CAKES*

28 Mar

20130328-091952.jpg

This week, I got a real craving for something naughty, but nice.  So, with it being Easter and having a large box of cornflakes at home, yet to be eaten, I thought…

…‘I know, MARS BAR CORNFLAKE CAKES’.

I ran home, purchased my ingredients and got to it.  Within 10 minutes I had made these little beauties, ready for my dessert.  They really didn’t take any time at all and they taste absolutely delicious.  I know my blog promises ‘healthy, nutritious foods’, which this recipe absolutely is not, but I think it is really important (as part of a healthy balanced diet), to know when a treat is acceptable. And, it TOTALLY is.

This is a great recipe to make with children, as it is no bake.  Though, I would suggest that the adult does the majority of the melting – steam can burn just as badly as water – so please do be cautious.

PREPARATION TIME: 10 minutes (this could take anything up to 30 minutes with little hands!)

COOKING TIME: N/A

MAKES: 12 mars bar cornflake cakes

INGREDIENTS:

  • 3 mars bars (standard size)
  • 50g milk chocolate
  • 30g butter
  • 1 tbsp golden syrup
  • 4 large handfuls of cornflakes – slightly crushed (you can add more or less if you like depending on how chocolate-y you want them!)
  • 12 mini eggs (you can eat the others!)

HOW TO MAKE THE MARS BAR CORNFLAKE CAKES…

This recipe is so simple.  The first thing you need to do is place 3cm of water in a medium sized pan and then heat this up – so that the water begins to boil.  Turn the heat down and allow it to simmer.

In a bowl place the chopped up mars bars, broken up milk chocolate, butter, golden syrup and then place the bowl on top of the pan of hot water.  The heat from the water should heat the bowl and melt all the ingredients together.

You will have to stir the chocolate/butter/mars bar mix, so hold the bowl with an oven glove and do this gently.  The mixture may curdle to start with, but after this it will all come together nicely.

Remove the bowl containing the melted chocolate from the heat and to this add the cornflakes.  As you add them crush them just slightly – this will make it easier to mix together.

Mix the chocolate and cornflakes together – don’t worry if some break.

Spoon the mixture into your cupcake cases (it should make about 12 cakes) and then add a mini-egg to the top of the ‘nest’ you have created.

Leave to cool and then eat!  They will be quite sticky and gooey… which is just what you want!  HAPPY EASTER from gemsfoodgems.

This is how the finished cornflake cake should look... YUM! HAPPY EASTER!

This is how the finished cornflake cake should look… YUM! HAPPY EASTER everyone!

[SINGING] HOT CROSS BUNS, hot cross buns, one a penny, two a penny, hot cross buns!

26 Mar

hot cross bunsIt is nearly Easter – which not only means that we get a 4 day weekend (wooo!), but also that we get to eat many HOT CROSS BUNS, Easter eggs, chocolate filled rabbits and the like!  Yum!

For me, Easter is a real treat in terms of my breakfast time habits.  I stop eating toast and/or porridge for a week (or two) and I treat myself to some delicious toasted Hot Cross Buns with butter each morning.

A couple of years ago my Nanna, who was a truly wonderful lady passed away.  She taught my mum all she knows about cooking and baking, who in turn taught me, so we decided to start a yearly tradition of making these Hot Cross Buns together; in time for Easter.  Hot Cross Buns are also something I vividly remember eating in a little cafe with my Nanna when she was looking after me.  We would go to town to get some shopping and treat ourselves to a toasted Hot Cross Bun with butter – just half each mind!  I loved it, and when I eat them now it takes me right back to the little cafe in the North.  There really is nothing like a ‘food memory’.

So, last time I headed to the North, my mother and I decided to take the opportunity to make some homemade Hot Cross Buns.  My mum (SallyAnn) is the proud owner of a ‘Mary Berry’ cook book, so this year we decided to try out her basic recipe – with a few of our own, family additions.

PREPARATION TIME: 2 hours (including the proving time and time to make the shortcrust pastry)

COOKING TIME: 20 minutes

MAKES: 12 Hot Cross Buns

INGREDIENTS:

For the Bread Buns

  • 250g strong white bread flour
  • 250g strong wholemeal bread flour
  • 60g light brown muscavado sugar
  • 1 x 7g sachet fast-action dried yeast
  • 1 tsp salt
  • 1 tsp mixed spices
  • 1 tsp cinnamon
  • 1/2 teaspoon nutmeg
  • 140ml luke-warm semi-skimmed milk
  • 140ml luke-warm water
  • 60g butter (melted and cooled slightly)
  • 1 large free-range egg (approx. 90g)
  • 120g sultanas/raisins or currants (without seeds)
  • 40g chopped apricots (optiona – if you don’t want to use these, use more currants/raisins)

Shortcrust Pastry Crosses

  • 50g plain flour
  • 25g butter
  • water (cold, enough to bind together)

Sugar Glaze

  •  2 tbsp caster sugar
  • 2 tbsp water

HOW TO MAKE YOUR EASTER TREATS…

To make the bread buns…

The kneaded dough, without any fruit.  These needs to be left to rise and double in size.

1. The kneaded dough, without any fruit. These needs to be left to rise and double in size.

♥ Sift the flour into a large bowl, stir in  the sugar, yeast, salt, mixed spice, cinnamon and nutmeg, and make a well in  the middle.

♥ Mix together the warm milk and water and add to the bowl with the melted and cooled butter, together with the whisked egg.

♥ Mix to a soft dough using a metal spoon.

♥ Knead the dough on a  lightly floured surface until smooth and elastic.  You will know when it is ready when the dough ‘springs back’, so shape into a ball, gently push your finger in about 1/2 a cm, then take it out – if the dough ‘springs back’ it is well kneaded – if not knead some more!

Dough split into 12 and rolled into small rolls, with the fruit added. Yum!

Dough split into 12 and rolled into small rolls, with the fruit added. Yum!

♥ Shape the dough into a round and then place in a large bowl.  Cover with a clean tea towel and leave to rise in a warm  place for 1-1½ hours or until the dough has doubled in size.

♥ Remove the dough from the bowl and ‘knock back’ using your fists – this removes all the air.

♥ Knead the dough on a lightly floured surface for 2-3 minutes  until smooth and elastic once again.

♥ Now add the currants and the apricots and knead for a minute until all the fruit is mixed into the dough.

♥  Divide the dough into 12 pieces and shape into small  rolls.

Perfect bun, with the shortcrust pastry cross.

Perfect bun, with the shortcrust pastry cross.

To make the crosses…

I would make the shortcrust pastry whilst the dough proves.  Then you can wrap it in cling-film and keep it in the fridge until you need to use it. Then…

♥ Roll out the shortcrust pastry to 5mm narrow strips – as you have 12 buns you are going to need 24 strands.

♥ Place one strip across the top of one of the bus, then place the other across this, to make a cross.  Press down lightly and if required, secure  with a little water and a pastry brush.

♥ Lightly oil 2 baking trays, arrange the buns on the  trays and cover with oiled cling-film.

♥ Leave to rise in a warm place for 30  minutes or until doubled in size. Remove cling-film – it’s time to bake the buns!

♥ Bake buns in a  preheated oven at 220 degrees C / Gas Mark 6 for 20 minutes (or until golden brown).

♥ Transfer the buns to a wire rack.

To make the glaze…

♥ Heat the sugar and water in a pan, until the sugar dissolves.  Do not let the sugar/water burn or begin to caramelise.  Make this whilst the buns cook.

♥  When you take the buns out of the oven and place them on the wire rack, you can brush them with the glaze and then serve warm or cold.

♥ If you let them cool, you can slice in half the next morning, toast and serve with a little butter!  YUM!

Hot Cross Bun - baked, with cross and glazed with the sugar and water.  Stunning!

Hot Cross Bun – baked, with cross and glazed with the sugar and water. Yum!

STORAGE:

The sugar glaze on these buns can make them go quite soggy, quite quickly and as they are fresh, with no preservatives the inside of the homemade hot cross bun can begin to go stale/dry quite quickly.  So, eat one or two fresh and store 2 or 3 in a large cake tin.  With the rest, chop them in half, put them in freezer bags and place them in the freezer for another day.

You know the days where its hard to get out of bed and there has to be something super special to make you get up and give you the start your day need.  I think these may just be that ‘kick start’.

LET’S CELEBRATE… I made it to 1,000 hits today! THANK YOU!

18 Mar

Thank you for helping me hit 1,000 views today!  A very happy little lady 🙂

Hello everyone, just a quick word from me… I made it to 1,000 hits today.  Thank you very much to everyone who has taken the time to read my blog and visit my pages.  I am a huge foodie, I cook and bake all weekend every weekend (apart from when I am at the gym or sleeping!) and it really is a huge part of my life.

I decided to write a blog a few months ago, so that I could share my passion with others.  At first I wasn’t sure I was going to be any good at it and wondered what my aim was, but with a help from a few others (you know who you are) I have fallen in love with blogging and now I spend my weekend cooking, baking, photographing, instagram-ing and wordpressing!

I set myself a few goals last month and today I reached my first one!  Knowing that people are reading my recipes and sharing my food experiences/stories is really great.  So thanks again and please do keep reading… you are making my day!

Gems x

It’s chilly… So let’s eat CHILLI… yum!

18 Mar

chilli 2Recently it has been very cold outside, and to be honest it doesn’t seem like it is going to get any better soon.  I heard the weather forecaster this morning telling the world it was going to SNOW in the North of England.  So, I thought that I should give you all my chilli recipe, to stave off the winter chills.

I used to prepare this chilli and make a relatively normal amount, so I could freeze the left overs.  I soon realised that rather than making 6 portions I may as well make a HUGE batch and then freeze the rest.  Therefore, my chilli has become an epic chilli making day.  I literally set aside a day to prepare this and then I can portion it up and freeze it for easy meals when I come home from work.

I am going to give you the recipe for my EPIC CHILLI and if you feel that it is too much, you can reduce the portion sizes.  However, the cost will increase per portion if you do this.

Here we go chilli people… this long winter will not beat us if we have chilli in our tummies!

PREPARATION TIME: 30 minutes

COOKING TIME: 45 minutes

MAKES: 20 portions

COST PER PORTION: approx. £0.67

I think this is really really good value for money (especially when you are purchasing fresh, lean beef mince).  I have used Sainsbury’s to buy my ingredients as it is most local to me, but do shop around try to buy your tins/cartons when they are on offer, as you can reduce the 67p even more.  Also, if you live near a market go there to buy your peppers, courgettes and onions as they will be significantly cheaper.

INGREDIENTS

  • 1kg lean beef mince (I buy 2x 500g packets when they are on offer.  These will cost approx. £6.00)
  • 1 tbsp olive oil 10p
  • 3 onions £1
  • 2 small courgettes £1
  • 2 large dark red peppers (I always feel like these have more vitamins and minerals as they are so deep in colour) £1.60
  • 2x 400g tins of kidney beans (In water, not chilli sauce, unless you really want that one!) £1.40
  • 3x packets of tomato passata (Don’t buy the ones in the glass jars they are a lot more expensive) £1.60
  • 300ml water
  • 4 tsp chilli powder 10p
  • 3 tsp black pepper 10p
  • 1 tsp worcestershire sauce 5p
  • 1 tsp salt (I do apologise, but it does need it…) 1p

You are also going to need some freezer bags… shop around for this, get the smallest ones you can.  I estimate these will cost 2p each so add this to the cost of the recipe to.

HOW TO MAKE THE CHILLI…

Lets do this in stages to make it more manageable…

1. Prep your area:

I warn you, your kitchen is going to erupt into kitchen mayhem.  So be prepared!  Lets start by getting out our pans.  I have 3 pans – we have a pan set, so I use these.  If you have 2 large pans this would be best.  Ensure you choose pans that have lids, we will need these! Get out your chopping board and a sharp knife.  Then get a bowl – this is going to be for all the rubbish from the onions (the skin and the root), the tops and tails of the courgette, the pith and seeds from the red pepper.

2. Prep and cook your vegetables:

We are going to prepare the onions first, so chop the top off, chop them in half and then peel them.  Leave the root intact, this will stop your eyes stinging anywhere near as much.  Now dice the onion so that it is quite fine.  If you like chunky vegetables then feel free to leave the onion quite large, I like everything small.  Do as you please!

Place the oil into one of the pans and heat until it is warm, not spitting.  Place the onions in and leave to cook until golden.  You will need to stir them every now and again.  Whatever you do, do not let them burn. (This should take 10 mins).

Whilst the onions are cooking wash your courgettes and red peppers.  Dice these finely (about the same size as the onions, however you did those) and then place to one side.  Chopping a red pepper is really easy – when you know how.  Place it down on your board with the stalk facing upwards.  Then chop down the edges of the pepper, so you end up with all the pith and the seeds attached to the stalk.  You can then chop off the rest of the base and the rest of the red pepper from the top… taaaa daaa!  Then you can chop the red pepper nice and finely… do this flesh side up, shiny side down – much easier.  The knife will glide.

Add the courgette and red pepper to the cooked onions.  We want to cook these until they just start to loose their colour and become soft.  This should take about 7 minutes.  Ensure the pan is on a medium heat.

At this stage I would add the salt, pepper and chilli and then leave to cook out for another 2 – 3 minutes.

3. Brown the beef mince…

In the second pan place the lean beef mince, turn on the heat and cook.  You want to keep ‘chopping’ this with the spoon you are using to stir, so that it all breaks up into little pieces.  Cook this until it is golden.  If you can do this at the same time as the onions, peppers and courgettes then great.  If not that is fine, but ensure you turn the heat off on the onion etc. whilst the beef cooks.  Browning the beef mince will take 10 – 15 minutes.

4. Share between the pans…

This is where the cooker starts to get messy!  Well mine does!  I now have veg in one pan, beef in the other – so either get a large bowl, throw everything in and then split between the 2 pans, so that they both contain the same, or add everything to one pan and split.  Its up to you, but now you need to ensure that both the pans are equal in veg:meat.

5. It’s time to get saucy!

The main ingredients for our chilli are now done.  Well done!  Now we need to make the sauce.  Add 1 and a half cartons of passata to each pan.  Add 1/2 the water to each pan too.  Now measure and add 2 tsp of chilli to each pan (you can always add more later if it is not ‘hot’ enough – but you cannot take it away, so be careful!).  Drain the tins of kidney beans, so there is no liquid and give them a good wash.  I find the best way to do this is to put everything into a sieve and then run water over the beans.  Add half to one pan and half to the other.  Shake approx. 1/2 a teaspoon of Worcestershire sauce to each pan of chilli annd then give them a good stir to combine all the ingredients.

It is now time to leave the chilli to cook.  So add the pan lids, bring the contents to the boil and then reduce the heat so that the chilli is just bubbling (simmering).  We are going to let this cook for half an hour.  Set an alarm for 10 mins and then stir the chilli, set for 10 mins and stir the chilli etc.  This will stop the chilli sticking to the bottom of the pan and burning.

pans

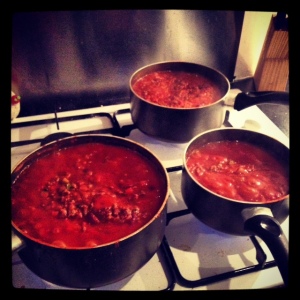
Here is my chilli cooking away… I split everything between 3 pans, which makes the maths complicated!
NB. My kitchen doesn’t seem to messy for ‘chilli day’.

You know the chilli is ready when it has changed colour and become a deep red/purple – as per the pictures.  The liquid should have evaporated off and the chilli should have reduced a little.  If it does not look like this, remove the lids, and leave for another 10 – 15 minutes.

I then allow all my chilli to cool down – with the lids on.  This takes a few hours.  Once it is cooled I place all my chilli in a very large bowl add 1 large cup of water, mix well and then its portioning up time!

6. Portioning up!

I get out my scales and my freezer bags and then I begin to portion up.  I am a Nutritionist and have worked for a well known supermarket, so I know that the approximate portion size for meat and sauce is about 200g.  I therefore weigh out 200g of chilli into each freezer bag.  I tie/roll and then place them in the freezer and I am done.

When I come in from work (generally on a Monday after a long day) I get one portion of chilli out the freezer and defrost it for 6 minutes in the microwave.  I then cook it in the microwave for 4 minutes, 30 seconds and then serve it with wild rice and a dollop of sour cream.  If I was more prepared I may leave the chilli to defrost in the fridge overnight then cook in a pan on the hob – but Monday holds an element of laziness (for me) so unfortunately I resign myself to the microwave.

HAPPY CHILLI MAKING PEOPLE.

The ORANGE-IEST, Lemon Cake you ever did see…

11 Mar
My orange coloured Lemon Cake.  It was phenomenal :)

My orange coloured Lemon Cake. It was phenomenal!

My mother and I made the lemon cake together yesterday for mothers day, using the eggs we collected from the chickens.  We then devoured it with a large mug of tea!

I just wanted to take the opportunity to share the end result of this cake with you here.  It was fantastically orange (due to the eggs we used from our chickens) and it was beautifully lemon-y.  It really was a taste sensation!  So, if you are doing any of your own baking at home and can afford to buy organic, free-range eggs do – you will not regret it, I promise.

Do you want to make my lemon cake?  If so, you can find the link on the right of the page under ‘A little Lemon Cake for my Mother Hen’, or simply click on this link!

If you make one of your own do send some pictures over to me, or send me a TWEET @gemsfoodgems.

Just a few of the chickens for the eggs for my Lemon Cake... Thanks!

Just a few of the chickens for the eggs for my Lemon Cake… Thanks!

A little LEMON CAKE for my MOTHER HEN…

10 Mar

photo (11)photo (8)photo (10)photo (12)photo (13)photo (14)

I feel as though I am today introducing you to my sisters!  Since my sister and I ‘flew the nest’ my Mother has taken on several chickens to love.  We say they are her ‘designer chickens’ as each one is a little ‘different‘, has a funny little name and a very amusing personality.  If you hover over the pictures the chickens ‘stared’ will be revealed.

As I am home for Mothers Day this year, I have had the opportunity to bake with the wonderful Free Range, Organic eggs that the chickens provide us with on a daily basis.  For me, this is one of the most special things about coming home, to my mum.  Fresh Eggs.  We have scrambled eggs in the mornings on fresh bread and then in the afternoons we collect the eggs and bake a seriously delicious cake, which is beautifully orange – due to the naturally intense colour of the eggs.  There is nothing more wonderful.

Without further ado, I give you my mum’s favourite cake recipe which we have made together as a treat for MOTHERS DAY, and to say thank you to her for being TOTALLY FANTASTIC.

These are the eggs we collected this weekend from our chickens...

These are the eggs we collected this weekend from our chickens…

PREPARATION TIME: 10 minutes

COOKING TIME: 30 minutes

MAKES: 2 large loaf cakes (8lb cakes)

If you want to make just one cake, simply halve this mixture.  We make 2 so that we can share them with family and friends.

INGREDIENTS:

For the cake:

  • 8oz (225g) Butter
  • 8oz (225g) Light Brown Sugar Sugar
  • 4 Free Range Eggs
  • 9 1/2 oz  (270g) Wholemeal Self Raising Flour
  • Juice & Zest 1 Lemon
  • Pinch of Salt
  • OPTIONAL: 2oz (60g) Poppy Seeds

For the lemon drizzle topping:

  • Juice of 2 lemons
  • 5 tbsp sugar

HOW TO MAKE THE LEMON DRIZZLE CAKES – JUST FOR YOUR MUM!

The first thing you need to do (as always) is to pre-heat the oven to 180 degrees C or Gas Mark 4.  Then you need to line your loaf tin with baking paper or if you have it with a case/liner.

Then in a bowl you need to cream together the butter and the sugar.  It is really important for this stage (if you are not using a mixer) that you use butter at room temperature, as otherwise it is just too hard to mix them.  The creaming method is great for getting some air into the cake to, so keep mixing the butter and sugar until you have a light/cream coloured mix.

Now you need to gradually add your eggs.  If you are a regular follower of my blog you will see that I advise you to break the eggs into a cup and then add them to the cake one at a time.  So do this, then give the mixture a good stir.  By the 4th egg the cake mix may be starting to curdle/separate, so do add a tablespoon or 2 of the flour.

Next sieve the flour into the bowl and then mix well, using a folding method.

Zest the lemon and pop this into the mixture and then the juice of the lemon.  It is best to use a sieve to do this, or a lemon squeezer, so that you don’t get any of the pips in the cake!  (If you are using poppy seeds add them in here and mix again.)

Finally, mix well and then split between the 2 loaf tins and bake in the oven for 30 minutes.

Whilst the cakes are cooking prepare the lemon syrup drizzle topping.  To do this pop all your ingredients into a pan, bring it to the boil (just) so that the sugar dissolves.  You don’t want to make toffee, so as soon as it bubbles reduce the heat and keep stirring.  Put to one side, until the cakes are cooked, but stir every now and again, so that the sugar does not start to crystalize.

After the alloted cooking time, take one of the cakes out and insert a clean skewer or knife into the centre of the cake.  If it comes out clean then the cake is cooked.  If it does not, pop it back in the oven for 5 minutes and repeat this until the cake is cooked.  Remove from the oven, gently stab it all over (only about 1/2 way through the cake) and pour over the lemon syrup.  Leave to cool and then slice and enjoy… (with a cup of tea!).

Ps.  Remember to say thank you to your chickens if you are using home grown eggs!

Strange little LOVE happenings… I just have to share with you.

8 Mar

Over the last month I have had a few strange sightings of foods that are shaped like love hearts.  I have been keeping you up-to-date about them on my ‘Food Related Bits and Bobs’ section, but it is getting so strange I thought that I would blog about them properly and also add them to my random section to, as I feel it is important to share these strange sightings.  I would also love to hear from you, if you have had any of the same/similar things happen to you i.e. rude vegetables, food letters, strange food shapes in general, as it is so interesting.

So, here is what has been happening to me.

20130214-091703.jpg9th February 2013

I decided to attend a friends baking club, its actually somewhere in Shoreditch, London where you volunteer your time and skills in return for someone elses skills.  On the 9th February I had been asked to share my baking skills, which I did.  I planned to make some little beetroot muffins (as per my blog) and when I arrived my friend Sarah said to me that she had brought me some cake cases.  To my shock and horror they were love heart shaped.  Now, I am a girly girl but I am not a love heart girl.  Sorry, just no.  It is NOT me.  But, fine for the sake of the other participants I thought it would be nice to go through with it, so I spread some CHOCOLATE BEETROOT MUFFIN LOVE.

20130214-095011.jpg14th February 2013

I blogged about it twice last month, but as we all know it was Valentines day. Great for some, not so much for others. I went shopping in my favourite fruit and vegetable shop in Shoreditch, did my grocery shop and off I went home.  I came to prepare dinner and found this little LOVE SPUD in my shopping.  I decided it was a sign and skipped around the house with a grin on my face for the rest of the evening.  It hasn’t turned out to be a sign at all (grrrrr!!), but this was the second time in a week that a random love heart had popped into my life, so I decided to document it and share it with you all.

photo (5)1st March to 6th March 2013

Since the 14th February I have had a few weird sightings of more love heart shaped vegetables and love signs.  The first came last weekend when I was chopping my chorizo for my homemade, pizza (yes including the base, using wholemeal flour people!).  I chopped the first slice, second, third and looked… are my eyes decieving me?  Am I making love hearts?  Yes!  A chopping board full of CHORIZO LOVE this time.  Feeling a little freaked out, but also kind of excitied (forever the optimist it would seem), I created a pattern of them and photographed them… so here they are!

photo (6)The next was when I was walking around Shoreditch and I looked down at some scribblings on the pavement thinking ‘WOW Banksy has branched out into pavement graffiti and I am standing on it’… mixed with ‘who scibbles on the floor in permanent marker pen, pah’… but no, I don’t think I had that quite right and rather it was some little love elf spreading love around Shoreditch, London.  Needless to say, I had no option but to photograph it…

Shoreditch is full of lovely little things like this, but I never see them in REAL LIFE.  So it was totally fab to see one for myself… and yes, those are my favorite brown boots.  The slogan is right ‘LOVE IS ALL U NEED’ (… along with a little bit of food, water and oxygen).

photo (3)My last, but not least sighting came on Tuesday afternoon.  I was running a cooking session (yes, I do this for a job to!) and I was preparing some fresh beetroots for the group, who LOVE beetroots.  They are obsessed.  My co-worker passed me a peeled beet to chop and voila, this little BEETROOT BEAUTY appeared…

As you will know if you are an avid follower of my blog, I have got on a train and headed to the North of England for some family time.  Whilst there I decided to share my love heart related stories.  To this my sister added ‘yeah it happened to me to’.  No way.  Yes way.

photo (7)My sister was preparing lunch for her and her boyfriend in their new home and was chopping some carrots.  There in the middle of the carrot was a love heart.  She instinctively photographed it, as she knew I was having some sightings of my own and then she shared it with me yesterday.  WOW.  So, we can now add a LOVE CARROT to the pile.

I am not sure if there will be any more FOOD LOVE in my life, but I am quite enjoying finding them and being surprised and excited as they appear.  This isn’t someting that has ever happened to me before and although I am optimistic I don’t look for things like this in every day life.  Sceptics amongst us will say ‘you only see what you want to see Gemma’… and yes you are very correct.  But I am not sure you can deny these are love heart shaped foods that I have simply stumbled upon.  I am not making them, adapting them or creating them… I am doing nothing to adjust the shape of anything.  But maybe I do see beauty in things, and for that I don’t think I can be critized.

I hope you enjoy my blog.  Thank you for reading, Gems… with LOVE x

Aunty Olive’s, Aunty Olive Biscuits… A treat if ever I have had one!

6 Mar

photo (1)

Heading home, back to the North of England, from London and thinking about its associations and my childhood brings me straight to food…  The main thing I think about when I am about to embark on my journey home will no doubt include all the meals I can have!  My mother will cook a certain selection of meals that we will agree on in advance, that will take me straight back to my childhood.  These include:

  • Fish, Chips and Mushy Peas (the nothern bit, they don’t do mushy peas down south)
  • Steak Pies with lashings and lashings of gravy, with mashed potato
  • Mince and Dumplings also known as a ‘Swimmer’
  • Hairy Chicken (this one you will have to ask my sister about; but it was simply something she noticed about chicken wings when she was little and used to enquire about… we don’t eat feathered chickens just because we are northern!)
  • A ‘sit around tea’ – which consists of sandwiches and a buffet style meal, only to be had when the whole family comes over
  • Cakes – my mum always has the cake tin stocked up, always.  When we were little people would come over to our house just to have my mum’s cake – not to play with me! Hehe!  So what cakes… parkin cakes, rock buns, chocolate chip muffins, bakewell tarts, and last but by no means least Aunty Olive Biscuits.

‘An Aunty Olive Biscuit?’ I hear you saying with a puzzled face!  Yes… that is correct, and you are not silly for not knowing what the heck they are.  Basically we had a fake aunty (it feels bad saying this, but you know what I mean!) who lived next door, with Uncle Harry and my little sister and I doted on them both.  We would be at her house 50% of the time we were at our own, and we would always be given homemade biscuits.  They were full of golden syrup and oats and my sister and I adored them.  Eventually my mother got a little bit sick of hearing about ‘Aunty Olive Biscuits’ and so she asked for the recipe and have made them ever since – to my families total delight!

They are a favourite of my mum’s, dad’s my sister’s and now my housemates.  I make them every so often and I know that they will be gone quicker than any cake.  The are special as they remind me of my late Aunty Olive and all the happy memories I had growing up.  So here we are, and do give a nod to Aunty Olive when you eat them…

PREPARATION TIME: 10 minutes

COOKING TIME: 10 – 15 minutes

MAKES: 12 biscuits

INGREDIENTS

  • 4oz (115g) margarine
  • 3oz (85g) caster sugar
  • 4oz (115g) golden syrup
  • 4oz (115g) self raising flour
  • 1 tsp bicarbonate of soda
  • 6oz (170g) porridge oats / rolled oats

HOW TO MAKE THE LITTLE TREASURES…

First things first, as with any recipe you need to prepare your oven (180 degrees C or gas mark 4) and then prepare your baking trays with baking paper.  I would use two trays, as from this mixture you will make approx. 12 biscuits.

In a small pan melt the margarine.  You don’t want this bubbling, boiling and then burning, so do this very gently on a low heat.  To this you are going to add the golden syrup, which is what gives them their gorgeous golden glow.  So, this is quite challenging to do, as you know syrup is sticky.  Place the syrup on the scales, zero/tare them so that they are on zero, and now we are going to remove the required amount (115g).  Use a dessert spoon, place it into the syrup…. ummmmm… now lift it out and start twirling the spoon, so that any ‘extra’ sryup will fall off and fall back into the tin.  Once you have no trail behind whip this over to your pan (on a low heat), stop twirling and scrape the syrup off.  Repeat this until you have taken 4oz (115g) from the tin.  The scales will read -4oz or -115g.

(Well done if you have done this without getting syrup all over your workspace – you deserve to lick the spoon!)

Heat the syrup and the marg together until they have come together and then place to one side.  You can now weigh out all the other (dry) ingredients into your mixing bowl.

To the dry ingredients add the warm syrup/marg solution and then bring together to make a dough, using your spoon (not the syrup one if you licked it!).  The dough will be firm and stiff, which is exactly right, as we are making biscuits!

Take a small handful of the oat/syrup biscuit dough and roll this into a ball.  Place this ball onto the baking sheet and repeat, until there is no dough left in the bowl.

Bake in the oven for 10 minutes.  They now need to be patted down, so do this using a spatula – not your hands – and then bake for a further 5 minutes.  They should be a beautiful golden colour now and smelling divine.  Leave them to cool and then indulge!

It is as simple as that.  Thank you Aunty Olive.