Tag Archives: #delicious

Live Below the Line: Tasty vegetable & BARLEY (but a little bit ugly) SOUP, ready for winter…July

28 Jun

20130628-070300.jpgSoup… a way to save money, loose a little weight and boost my vegetable intake.  So, why not!  I love soup, I really really do.  I hate soup when my tuppawear opens and it leaks all over my bag, but this is a very rare occurance and it is the ONLY time I dislike soup.  I cannot think of any reason why people should not make it and eat it in summer… it lasts in the fridge, the taste increases (for the better) overtime and I just love it… as I am sure you will to.

I think soup is a traditionally quite a nothern staple.  I know as a little girl we were served a smooth vegetable soup as soon as my mum thought one of us had even a slight cold (evidenced by a little cough or a sneeze that she noticed and prayed upon).  Rather than it being a torturous occasion to have this soup, we would relish it and if we were really good mum would either make some homemade bread to go with it, some baked chicken wings or (my personal favourite) a little cheese on toast.  I have  (over the years of living away from home) tended to experiment with soups and now, as an adult, see them as a great way to boost my vitamins, minerals and even my fibre intake – with added pearl barley.  I am also more than happy to order them for dinner in a restaurant, as they are generally inexpensive, heart warming and really really filling.

I love pearl barley, nearly as much as I love soup.  It really bulks out a dish, but it is a wholegain and is great for your digestive system, as it is high in fibre and wholegrain goodness (extra B vitamins and some essential fatty acids).  It is also very cheap and if fills me up, so there is not much more that I could want from a food product!  If you haven’t cooked with it before, there really is no need to worry.  It is extremly simple to use, you just need to ensure you cook it until it is soft (like rice!).

I have decided to make this recipe a part of my ‘Live Below the Line’ series, as it really is THAT cheap to make.  You don’t even have to add the chicken (maybe just add some more veg if you don’t) but if you don’t have a lot of money and want something wholesome, healthy and low in calories, high in nutrients then you really don’t have to look any further… here we go!

PREPARATION TIME: 10 minutes

COOKING TIME:  45 minutes

MAKES: 4 portions

COST: 42p per portion (without the chicken it would be cheaper at 20p per portion)

INGREDIENTS:

  • 2 chicken thighs or 3 drumsticks (£3.00 for 6 thighs, so £1 for 2 – you could use a wing or drumstick, I prefer to buy de-boned thighs just to save me some time but using the drumsticks would cost about 88p)
  • 1 chicken stock cube (10p)
  • 2 carrots (12p)
  • 1 potato, or 5 new potatoes with the skin on (28p – see if you can buy them singulary or if there are any offers on large bags or reductions)
  • 1 large onion (if you buy a large bag of about 16 onions for £1 then use 2 of these as they are a little smaller – this will set you back about 12p)
  • 1 cup of pearl barley (59p for a 500g bag of this and you will need about 150g of dried pearl barley, so this will cost 17p)
  • Water (to cover, about a litre)
  • Black Pepper (to taste – a store cupboard ingredient)

HOW TO MAKE THE CHICKEN & BARLEY SOUP…

The first thing to do is to finely dice your carrots and your onions and pop them in a large pan.  To this add a dash of olive oil and cook for 5 minutes until they are just start to soften.

Whilst the carrots and onions cook, soak the pearl barley in a bowl with boiling water and place to one side (for about 20 minutes).

Add the chicken, and the stock cube to the pan and then cover with water.  If you are using a medium sized pan, fill the pan until the water level comes to about 2cm below the top (it should be about a litre, but you may need more – it depends if you want a thick chunky soup or a slightly more watery, soup).  Place a lid on and bring to the boil.  Once boiling reduce the heat and simmer for 30 minutes.  At this point the chicken should be cooked, so remove from the pan and place on a chopping board.  You need to cool the chicken down, so that you can shred it.  If you do this whilst it is still hot you will have very sore hands!

The pearl barley should now have softened a little, so pour into a sieve and then rinse until the water runs clear.  This will mean you have removed some of the starch, which is fine.  Add this to the soup and again return the soup to the boil.  Dice the potatoes (with the skins on for extra fibre) and then add to the pan.  You need to cook this until the pearl barley is soft… it’s a little like cooking rice.  If you don’t cook it through it has a hard centre which tastes bitty and unpleasant.  It will take about 20 to 30 minutes for the pearl barley to soften, so once boiling, reduce to a simmer and continue to cook.

Once the chicken is cooled, remove the skin and discard, then shred using a fork (or your fingers… after all they were they best tools we were born with) and then add this back into the soup.  Discard the bones and continue to cook the soup until all the vegetables etc. are soft.  I would add my pepper with about 5 – 10 minutes of the cooking time left and then taste to ensure I have added enough.

This soup should not be blended to a smooth consistency – which is why it is important to dice the vegetables nice and small.  Then serve… use a nice bowl to make it look a little prettier and if you wish serve with some nice chunky brown bread.  YUM!

20130628-070337.jpg

The finished soup! I know it does not look that appetising, but that is because everything (the pearl barley) has sunk to the bottom and is all I could photograph was the watery soup… believe me it TASTES AMAZING!

WARNING: This recipe is NAUGHTY, but BOY they taste good… *MARS BAR CAKES*

28 Mar

20130328-091952.jpg

This week, I got a real craving for something naughty, but nice.  So, with it being Easter and having a large box of cornflakes at home, yet to be eaten, I thought…

…‘I know, MARS BAR CORNFLAKE CAKES’.

I ran home, purchased my ingredients and got to it.  Within 10 minutes I had made these little beauties, ready for my dessert.  They really didn’t take any time at all and they taste absolutely delicious.  I know my blog promises ‘healthy, nutritious foods’, which this recipe absolutely is not, but I think it is really important (as part of a healthy balanced diet), to know when a treat is acceptable. And, it TOTALLY is.

This is a great recipe to make with children, as it is no bake.  Though, I would suggest that the adult does the majority of the melting – steam can burn just as badly as water – so please do be cautious.

PREPARATION TIME: 10 minutes (this could take anything up to 30 minutes with little hands!)

COOKING TIME: N/A

MAKES: 12 mars bar cornflake cakes

INGREDIENTS:

  • 3 mars bars (standard size)
  • 50g milk chocolate
  • 30g butter
  • 1 tbsp golden syrup
  • 4 large handfuls of cornflakes – slightly crushed (you can add more or less if you like depending on how chocolate-y you want them!)
  • 12 mini eggs (you can eat the others!)

HOW TO MAKE THE MARS BAR CORNFLAKE CAKES…

This recipe is so simple.  The first thing you need to do is place 3cm of water in a medium sized pan and then heat this up – so that the water begins to boil.  Turn the heat down and allow it to simmer.

In a bowl place the chopped up mars bars, broken up milk chocolate, butter, golden syrup and then place the bowl on top of the pan of hot water.  The heat from the water should heat the bowl and melt all the ingredients together.

You will have to stir the chocolate/butter/mars bar mix, so hold the bowl with an oven glove and do this gently.  The mixture may curdle to start with, but after this it will all come together nicely.

Remove the bowl containing the melted chocolate from the heat and to this add the cornflakes.  As you add them crush them just slightly – this will make it easier to mix together.

Mix the chocolate and cornflakes together – don’t worry if some break.

Spoon the mixture into your cupcake cases (it should make about 12 cakes) and then add a mini-egg to the top of the ‘nest’ you have created.

Leave to cool and then eat!  They will be quite sticky and gooey… which is just what you want!  HAPPY EASTER from gemsfoodgems.

This is how the finished cornflake cake should look... YUM! HAPPY EASTER!

This is how the finished cornflake cake should look… YUM! HAPPY EASTER everyone!

Gemma’s Marvellous Medicine #2 – Chicken Noodle Soup

24 Feb

Image

I hope you all enjoyed my blog yesterday ‘Gemma’s Marvellous Medicine #1 – Honey & Lemon Drink’?  If not, do have a little read, as it will hopefully help you to start feeling better, as there are a lot of colds and bugs going around at the moment.

The other thing I made for myself this week, to give me a little boost, is this ‘Chicken Noodle Soup’.  As a little girl, whenever I was ill, my mummy would make me chicken soup – now this was generally the tinned variety, but if you have had a similar experience, you will know what I mean when I say it makes you feel better instantly.  Me and my friends call this recipe ‘Chicken Soup for the Soul’, as it is the ‘pick-me-up’ you need – a hot, tasty and fresh soup, which warms the cockles of your heart.  It is delicious!

This recipe also costs very little to make – my calculations for how much it cost me are below (though remember I bought all of my ingredients in a local supermarket in central London, so the  price will be slightly higher due to that).  It cost me £3.62 to make this recipe and I took the other portions to work for my lunch, so per portion it was 90p.  BARGAIN!  So lets get cooking this tasty, cheap, Chinese chicken noodle soup!

PREPERATION TIME: 5 minutes

COOKING TIME: 30 minutes

MAKES: 4 portions of soup

INGREDIENTS

  • 2 Chicken Thighs (98p)
  • 1 tin of ‘naturally sweet’ sweetcorn (you can use any you like, but I think that this is the tastiest) (65p)
  • 1 bunch of spring onions (£1)
  • 2 chicken stock cubes (50p)
  • 1 egg (29p)
  • 75g noodles (I use wholemeal noodles for an extra health boost, but any noodles are fine – or even fine spaghetti if you cannot buy noodles) (15p)
  • 1 tbsp cornflour (5p)
  • 1 pint boiling water
  • Black pepper to season

HOW TO MAKE THE SOUP…

Grab a large pan and place it on the hob.  Fill the kettle with cold water and get that boiling.  Open the tin of sweetcorn and pop this in the pan, then dice the spring onion into small pieces (about 5mm) and throw this in the pan.  When I work with people from the community, teaching them to cook, the first thing they do with Spring Onions is to chop the top 6 – 10 cm off and throw them in the bin.  This makes my heart sink!  NO!  The green tops of the onion are fantastic for us.  You may want to tidy the spring onions and cut off the first 2mm, but you really must use all the spring onion.  The green part holds different vitamins and minerals (such as vitamin C, iron and folic acid) which are essential for our good health.  So, please do not waste any of this fabulous vegetable.

Place the chopped spring onions in the pan together with the 2 chicken thighs and then add the pint of boiling water.  Turn the heat on – to a medium heat so that the water is gently simmering/bubbling, but you don’t want it on a rolling boil – this is too hot.  Now add the 2 stock cubes and the black pepper (I use quite a lot of this) and then give this a good stir, to dissolve the stock cubes.  Place a lid on the pan and leave the soup to cook and the flavours of the chicken, sweetcorn and spring onions to come out and flavour the liquid.

We need to allow time for the chicken to cook through – this should take about 20 minutes.  After this time, remove one of the thighs, place it on your chopping board and cut into it.  If there is no blood it is cooked.  Remove the other thigh, repeat this process and then leave the chicken to one side.  If they are not cooked, pop them back into the water and leave for 5 minutes then repeat the checking for blood.

Now we need to work on our soup, so lets add the noodles and let these cook – this will take about 10 minutes.  Whilst this occurs crack your egg into a mug/cup and whisk – as if you are going to make scrambled eggs.  In another mug add the 1 tablespoon of cornflour and add water to this to make a fairly thin mixture.

The noodles will be cooked by now, so get a fork, place this into the soup and make small whisking motions in the centre.  Continue doing this whilst you very slowly pour in the whisked egg and you will see small bits of white egg form in the soup.  This is what you see in all the chicken and sweetcorn soups you get from the Chinese take-away/restaurant, and when you eat one of these later it will be just delicious, but it also adds to the Chinese authenticity of this dish. YUM!

The soup will be quite thin and watery now – unlike those in the Chinese, so we need to thicken it.  This is where your cornflour and water mixture comes in.  Stir the soup with a large spoon and slowly add the cornflour, you will notice the soup thickening.  Add as much/as little cornflour as you like to make the soup the consistency you want.  Once the soup as cooled it will thicken much much more, so go steady and use less rather than more!

Finally, shred the cooked chicken thighs using forks (if they are hot) or your fingers.  You want to make lots of little chicken strands, not huge chunks of chopped up chicken – for some reason it just doesn’t taste the same, or wrap around the noodles and egg if you chop the chicken, so avoid this and get your hands in!

Add the chicken to the soup, stir well and after 5 mins (once the chicken is heated through again) serve this in a large bowl.  You can add more pepper to taste if you like!

Now, you will feel satisfied and will hopefully have a little smug smile on your face as you battle your germs.  HAPPY EATING!Image

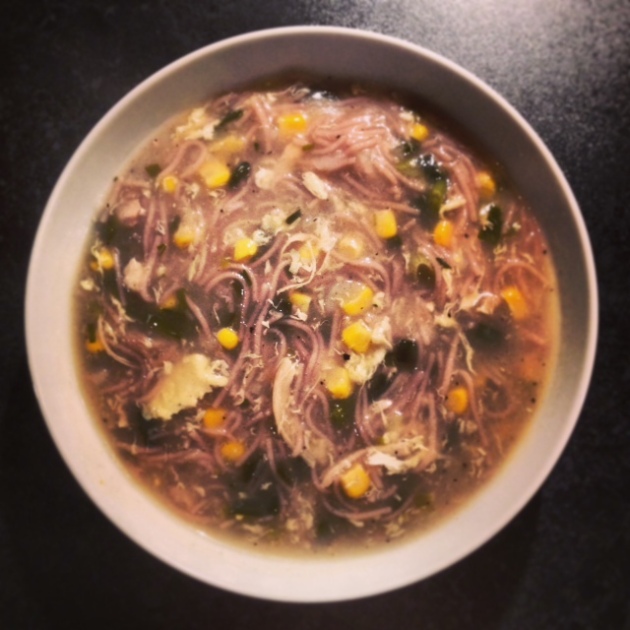
Ps.  My soup (as per the picture opposite) looks very purple!  This is right and it is not your eyes playing tricks on you!  I used wholemeal noodles which I get from my local Vietnamese supermarket and when you cook with them they look like little purple worms in your soup.  I also went a little overboard on noodles – so my soup was very purple and quite stodgy.  Kids will love the purple noodles, you could even rename the soup chicken worm soup – just to get them to give it a try!

BEETROOTS are Red, Violets are Blue, I’ve got a beetroot muffin for you!

14 Feb

20130214-091703.jpgHAPPY VALENTINES DAY BLOGGERS…

Whether we have been dreading it or looking forward to it and planning the purchase of random ‘love’ gifts for you partner for weeks; the day is finally here.

I was so close to having a Valentines this year, yet once again so far.  But not to worry (…and please don’t feel sorry for me) I have just been baking to compensate!

I hope you all have a fabulous Valentines day and if you are cooking tonight, please do make these little muffins.  They are great fun, deliciously moist and a stunningly beautiful little muffin.  ENJOY!

Preparation Time: 10 minutes

Cooking Time: 20 minutes

Ingredients:

  • 180g plain flour
  • 60g cocoa powder
  • 2 tsp baking powder
  • 150g light brown sugar
  • 3 eggs
  • 150ml vegetable oil
  • 250g cooked beetroots (not pickled!)
  • 1 tsp vanilla extract

How to make these love muffins…

First things first – you are not going to be able to make a love muffin unless you have a love heart shaped muffin tray, or at least a muffin tray with love heart shaped paper cases.  So, sorry but you are going to need to invest in those… and quick!

The muffins are so easy to make.  The first thing you need to do is to prepare the muffin tray and preheat the oven to 180 degrees (Gas Mark 4).  Now you can get all your dry ingredients ready, so weigh out the flour, cocoa powder and baking powder and then sieve them into a large mixing bowl.  (It is important to sieve here as you do not want lumps of cocoa powder).

Add the sugar to the dry ingredients and then mix well so that the flour, sugar, cocoa powder and baking powder are all combined together.

Make a well in the centre of the dry ingredients using a large spoon and then crack the eggs into here.  (You may want to bread each into a cup first just to check they are fresh/not bad, and then you can pour them into the well).

Measure out the vegetable oil into a measuring jug and then to this add the 250g of cooked beetroot.  This is the fun bit (and if you have children then will love doing this!), its BLENDING TIME!  So, insert the blender into the centre and blend until you have a smooth, light pink mix.

Add the bended oil and beetroot to the well along with the eggs and then using a fork or a metal spoon and start to bring together all the ingredients.  Keep mixing (not beating) until there are no pockets of flour and the mixture is smooth and deep in colour.

Spoon the mixture into the muffin cases/tray until each compartment is about two thirds full.  Bake in the oven for 20 minutes.  When you take them out of the oven they should have risen beautifully and if you insert a skewer or knife into the centre it should come out clean.  If not then pop them back into the oven for 3 minutes.  Repeat until cooked.  Remove from the baking cases/moulds and leave to cool on a cooling rack.

HAPPY BAKING this VALENTINES DAY!

It’s a little bit STICKY, this feeling inside… Sticky Chicken & Sticky Rice.

11 Feb

sticky chickenRandom title to this article (as per I guess!), but it is valentines week and my favorite/romantic film of all time is the Moulin Rouge. Not only did a boy buy me this film (and he was my boyfriend at the time), but I loved the production of the film and the whole theme is LOVE. So, I think this valentines day you should make your loved one this Sticky Chicken recipe as I am sure that if they don’t love you already, they most definitely will after eating this!

This recipe was a marinade (that I found) for chicken legs, thighs and wings and I looked at it and thought ‘if I add some vegetables to this and cooked it in a pan on the hob, would it make a tasty Chinese dish?’. I gave it a go and hey presto! It has now made its way into my weekly repertoire of foods to cook, and even more recently has been on my menu for a date! I am pleased to report that it worked and he was completely charmed by my cooking skills… (girls pay attention, the way to a man’s heart is through his stomach!).

The ginger, sesame oil and soya in this recipe make the dish taste very authentic. It is very important to cook the onions for a while first, so that they have a soft mouth feel, then the rest can be thrown in. I choose the vegetables I did as these are my favorites, but have a think about what veg you like and perhaps you could throw those into the mix to?

Preparation Time: 15 minutes

Cooking Time: 20 – 25 minutes

Makes: 2 sticky chicken & sticky rice portions

Ingredients:

For the main dish…

  • 1 chicken breast
  • 1 sweet red pepper (or 1 red bell pepper)
  • 1 large carrot
  • 1 large onion

For the sticky rice…20130211-175330.jpg

  • 150g of sticky rice/glutinous rice (… this is available in some large supermarkets and looks like this – see image)
  • 260ml cold water

For the marinade…

  • 2 tbsp sesame oil
  • 3 tbsp dark soya sauce (NB. light soya sauce does not mean ‘light’ as in healthy… it’s actually stronger and should be used as a dressing for an asian salad or as a dipping sauce.  The dark soya sauce has a stronger flavour and should be used in your cooking.)
  • 3 tbsp honey
  • 2cm ginger, peeled
  • 1 red chilli (with seeds if you like it hot)
  • 1 clove garlic
  • 1 tsp Chinese 5 spice
  • 1/2 tsp chilli powder

How to create the dish…

Let’s make the chicken and sauce first.  So, I always prepare my onion first, by chopping the tip off, peeling it and then cutting it in half.  Now you want to make half moon shapes, so slice the onion fairly thinly and make the half rings.  Once you have done this, put a little sesame oil in your pan, heat it gently then drop the onion in.  The onion needs to cook for appox. 10 minutes before you can add the other ingredients, so lets get prep-ing!

Prepare the pepper by de-seeding it and then chopping into into slices – whatever size you like.  Next cut the carrot.  So that it cooks you want each piece to be very thin, so I would actually hold the carrot and use a peeler to create very thin slices (think what the carrot is like when you order Chinese from your local – you want them like that.

Now the chicken,  I would cut the breast along the longest part (length ways) to form 3 or 4 (depending on the size of the breast) fillet pieces.  Then I would cut each one of these so it is quite thin.  This is for 2 reasons 1) it will cook much more quickly when it is thinner, so you can be sure it is cooked and 2) each mouthful should then hopefully have some chicken in it!

Place all the chopped ingredients and add to that the ingredients for the marinade.  With the ginger, you need to peel that with a teaspoon (yes really!!)  Just scrape a teaspoon over the ginger root and voila, the paper-y skin will just come straight off and you will hardly waste any ginger.  You will also be able to get into the nooks and cranny’s of the ginger.  YES!  The ginger is best grated on a very fine grater, not the normal one you do your cheese on.  Once you have grated approx. 2 cm of ginger pop this into the bowl with the other ingredients and the marinade.  Give this a stir and then put it into the pan with the onions, leave this at a medium heat and stir it occasionally so it doesn’t stick.  If it is getting dry (which it shouldn’t do) you can add some more soya sauce and maybe a little water.

Sticky Rice… this does not cook quite like normal rice, it is very sticky… hence the name!  So, lets weigh out what we need and then put this in a pan and onto a low heat.  Place a lid on the top and let it cook.  You are going to need to stir this every now and again to, and you may need to add a dash (but honestly ONLY a dash) of water every now and again.  The rice will stick to the bottom of the pan as the starches are released.  This is ok, just use a spoon to scrape it off, stir into the rice and let it continue to cook.  Keep repeating this and trying the rice every few minutes after about 15 minutes of cooking and once the hard bits have gone the rice is ready!

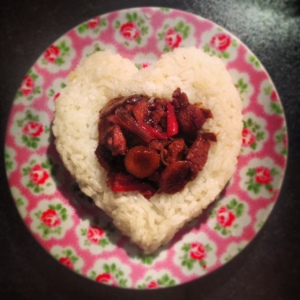
To serve… you can create my love heart if you like.  Just pop a portion of rice on the plate and then use a wet metal spoon to mould the rice – if you use your fingers or a dry spoon it will just stick and make a BIG mess!  Then you can cut a little circle out of the centre and spoon in the chicken and sauce.  WOW!

Alternatively… serve in a bowl with your rice on one side and the chicken and sauce on the other.

Either way, this dish is certainly delicious and you will most definitely be making it for your partner over and over again!

LOTS OF LOVE… GEMSFOODGEMS.

sticky 2

Winter Warm… Spicy Butternut Squash Soup!

24 Jan

Feeling cold?  Feeling a little down?  Feeling like you need a boost of vitamins and minerals?

Look no further!  This week I have been making this delicious winter warmer, and as per usual I took a recipe I know and then mixed it up a little.  It’s the time of year where we all need a good, hearty soup for our lunch/dinner to keep us warm, but so we feel like we are being good to ourselves too…. It is January after all!  I know I require soup at this time of year! So, why not make this recipe and then  freeze some of the portions for another day (see below), or you can pop it in a warm flask or Tupperware and take it to work with you for a delicious lunch.

If you want to eat this with some bread, try to choose a wholegrain/brown bread, as this will be packed with wholegrain goodness!  You could even have a tasty scone (see my next recipe, coming soon!) and make sure you eat these warm, with piping hot soup!  WOW!

Makes: 6 portions

Preparation Time: 15 minutes

Cooking Time: 20 minutes (until all the squash is soft)

Ingredients:

  • 1 tablespoon oil
  • 4 carrots (finely chopped)
  • 2 stalks celery (finely chopped or grated)
  • 1 Leek or 1 large onion (finely chopped)
  • 1 large Butternut Squash (diced or grated)
  • 4 handfuls Red lentils
  • 2cm grated ginger
  • 1 ½ tablespoon ground coriander
  • 2 tsps ground chilli OR 2 fresh chilli’s, finely chopped (or enough to suit you!)
  • 3 cloves of garlic, finely chopped/grated
  • 1 tin reduced fat coconut milk
  • 2 litres / 8 cups water
  • 2 vegetable stock cubes
  • Black pepper to season
  • 3 bay leaves
  • 1 handful of finely chopped fresh coriander – to serve (optional)

Method:

Wash your hands, get all your equipment and ingredients ready and then before you chop anything wash all your vegetables.

The lentils need washing next.  Place your 4 handfuls of red lentils into a large bowl.  Add lukewarm water and using your hands rub the lentils together.  You will notice the water turns cloudy.  Drain the water and repeat until the water is clear (approx. 3 rinses).

Next the lentils need to be cooked.  Most people would probably put the lentils in towards the middle/end of the cooking process, but this isn’t the right way to use lentils in your cooking.  It’s best to cook them and allow them to soften before you add any other ingredients.  So, place them in a pan, add the 2 litres/8 cups of water and bring this to the boil and then allow the lentils to simmer whilst you prepare the vegetables.

Now you are ready to start preparing your vegetables.

It’s really important when making a soup to ensure that all the vegetables are cut to the same size – this will ensure they all cook at the same speed.  So, if you are grating your vegetables (this will reduce the cooking time by 5 minutes) then you need to grate the carrots and the butternut squash.  If you are chopping – chop the carrots, butternut squash, celery and onion (or leek) so they are all the same size – no more than 1cm cubed.

You will notice that the pan with the lentils in is boiling away nicely, but that foam has developed on the top.  Spoon off this foam and throw it away – it doesn’t add any flavour, in fact just the opposite!

So, you’re ok to put all your vegetables into the pot now.  Place them in carefully – do not burn your hands and then add all of your herbs and spices.  Chilli is a flavour that some people can handle and others can’t, so if you are not sure just add 1tsp.  If you are brave or just like spicy food you can add a few more – but you must taste after each one to check it’s not too spicy.  If it is too spicy it could be inedible. Add the crushed/finely chopped garlic, stock cube/s and ginger.

Bring the soup to the boil and simmer for 20 minutes until the vegetables are soft.

Finally add the reduced fat coconut milk, stir well and take off heat.  I choose to use reduced fat coconut milk as it just reduces the calories a little, without taking away any of the flavour – so why not?  I think this is a slightly healthier option; especially if you are watching your calorie intake!

If you prefer a smooth soup then blend the soup with a hand blender or food processor for a thick, smooth consistency.  If you like chunky soups then you can leave it without blending; it will taste just as good.

Serve with brown, wholemeal or granary bread for an additional treat – or to make the meal even heartier.

WHY THIS RECIPE?

Squashes are in season from August right through to March, so they are a fantastic winter vegetable.  They are a great source of fibre, to help you feel fuller for longer and they also contain lots of Vitamin A and Vitamin C.  Vitamin C is really important in the winter months as it helps boost the immune system, which can help you fight off colds or even prevent you from getting them in the first place.

Soups, as you will know are a great winter warmer!  So, if you live alone, don’t discount this recipe as it makes 4 portions.  Get creative!  You could make this recipe, eat one portion right away and freeze the other 3 for occasions you fancy some hearty soup.  Ensure to freeze it in suitable containers so that you can easily defrost and reheat the soup – you may just need to add a little more liquid when you come to heat it up again.  Alternatively, you could take this soup to work in a flask as a tasty, healthy lunchtime treat or out on a walk in the biting cold to help you defrost and re-energise.

If you decide to eat some bread with this soup, try to choose a healthy wholemeal/brown bread.  Wholegrain/brown bread is a great alternative to white bread as the wheat is not refined, so you get the wholegrain goodness, which includes extra fibre, B vitamins and essential fatty acids.  The increased fibre will keep you feeling fuller for longer!

It’s Mince Pie time… Pastry making skills at the ready?

15 Dec

photo(3)

It’s Mince Pie time!  There has been a little time now since my last post ‘Seasons greetings with my Mince Pie filling…‘ so you should have a delicious mincemeat ready to fill the mince pie pastry here today.  If you haven’t made mincemeat and would rather not use a shop bought version packed with preservatives and filled with fat (suet) then find my blog and have a go!  It’s quick, easy and totally delicious.

So it’s now pastry time and I can feel your fear from here.  How can I reassure you?  Well as I have said before, it’s all about having a go, so follow my tips and my recipe and you won’t go wrong.  I promise.

The most important thing to remember is you need cool hands, cold water and butter at room temperature.  If you don’t have cool hands you can cool them down in cold water for a few minutes before getting started.  So… turn the cold taps on and get your hands under right up to your wrists (you need to cool your blood so your wrists are the best place to cool).  Grab a jug of cold water and add some ice cubes, and make sure the butter has been out of the fridge for 30 minutes – or so.

Let’s get baking!

Ingredients

  • 100g plain white flour
  • 100g wholemeal flour (to make them a little healthier)
  • 80g butter (at room temperature)
  • 40g brown sugar
  • Zest 1 orange
  • Juice 2 oranges (add 2 ice cubes) / iced water to bind (approx 50ml)
  • 1 tsp mixed spices
  • Milk to brush

Method

First we need to make the pastry and if you can master this you can make shortcrust pastry for pies etc. and won’t need to buy it.  This will impress everyone who comes to dinner.  So, without further ado… Sift the flours into the bowl and then chop the (room temperature) butter into cubes and add to the bowl.  Now you need to make breadcrumbs so… pick up the butter and the flour (with your cold hands) and using your thumbs, rub the mixture across your fingers.  It’s a tricky process to describe!  Continue this until you have lots of fine breadcrumbs.

Now you can add the flavour to your basic pastry mix.  Add the sugar, orange zest and mixed spices to the breadcrumbs and mix well.  We are making a tasty, sweet pastry – hence the sugar, but if you wanted plain pastry you would omit these extra ingredients and just add some water now.  Mix together well.

Next is the liquid.  You will need to add the liquid you have chosen – either orange juice or water – a little at a time.  If you add it all at once it could be much to soft and you will not be able to make pastry.  So, add a tiny bit of liquid and mix with a cold, metal spoon.  Add more liquid and repeat the mixing.  Continue this until the breadcrumb mix is just combining to a lumpier consistency and then stop.  Take the pastry out of the bowl, and to bring it all together into one large ball.  Wrap it in clingfilm and place in the fridge for 30 minutes.  It needs a rest and so do you (for doing so well of course!), so you can have a cup of tea while you wait and then you can grease the muffin/bun tin with a little butter.

Resting time done? Baking trays greased?  Excellent – it’s time to roll out.

Flour your work surface with plain flour and then pop the pastry onto the floured area.  Sprinkle a little flour over the top of the dough and flour the rolling pin.  Roll out the pastry.

Now I personally think its best to roll the pastry back and forth 3 times then loosen the pastry with your fingers, turn it 90 degrees on the work surface and roll 3 times, loosen, turn 90 degrees etc.  This allows me to make sure the pastry isn’t sticking and to make a square that fits on my work surface.  Not a huge oblong!

Keep following my rolling process until the pastry is about 3mm thick (no more or you will only taste pastry).  Use a large scone cutter to cut out the bases and a smaller one for the lids.  Drop the large base over the top of the muffin tray/bun tray but DO NOT PUSH IT DOWN.  If you do this they will stick and you will not be able to get them out.  You will cry.  I know from experience!

Once all the bases are in, put in 1 tsp (only) of filling.  this can bubble out if you put too much in, so in this case less is more.  Using a pastry brush, brush milk around the edge of the little pie and sit the lid on top.  Push the edges together gently and then milk the tops.

Before I bake them I like to use a little knife to make a slit in the lid of the pie.  This allows steam out and also makes them look authentic!

Bake in the oven for 15 minutes or until golden.  Using a knife carefully lift the pies out onto a cooling rack (if you don’t do this they will get soggy bottoms).  Sprinkle caster sugar over the top and VOILA!  You have made perfect mince pies.

ENJOY & most of all a Merry Christmas to you and your loved ones!

photo(4)

Ps.  After my post last week I badly cut my middle finger on my left hand.  So apologies if this recipe isn’t as detailed as normal and there are typo’s.  I am typing very slowly and inaccurately with one hand… ouch!

Seasons Greetings with my Delicious Mince Pie Filling…

12 Dec

Image

This week I have been making copious amounts of this fabulous mincemeat!  Why!?  I hear you ask.  Well… I work as a Nutritionist in the community teaching others in the world how to cook, create healthy delicious foods and I really want to inspire others at home to have a go – plus its the CHRISTMAS SEASON.

Baking is really not as complicated as people think and my belief is – its important to have a go.  As in all walk of life, you learn from your mistakes and believe me I have/have had many and will have many more.

So without further ado, here is my first blog about these gorgeous mince pies!

Making the Mincemeat

This really is THE most important part of the mince pie and if this is not absolutely delicious no one will like your mince pies.  (Getting straight to the point!)  I have manged to convert 6 mince pie haters in the last week with this simple recipe so here goes…

Ingredients

  • 20 pitted dates (the fresher the better – the hard ones need soaking overnight)
  • 250g golden sultanas / turkish sultanas – these are they key!
  • 250g currants – without stones
  • 100g raisins – without stones
  • 100g apricots – finely diced
  • 3 oranges – zest of 2 and juice of 3
  • 2 large cooking apples – peeled and grated
  • 1 tbsp brown sugar
  • 2 tsp cinnamon
  • 1 tsp nutmeg

Optional – you could try substituting the 100g raisins/sultanas for dried cranberries if you would like!  Be experimental!

Method

Follow the ingredients list above to ensure that all your ingredients are prepared as listed.  Then its simply a case of combining everything into a large pan.  This must be heated on the hob at a gentle simmer (do not allow to boil), with regular stirring; so that all the ingredients combine together and make a thick mincemeat.

If the mixture is not regularly stirred you will find that some of the mixture could stick to the pan and burn, so do not allow this to happen.

Benefits of making your own

  • Any extra can be stored and put into jars for Christmas presents
  • Everyone will be surprised/amazed that you made your own mincemeat
  • There is very little added sugar (its mostly just sugar from fruits)
  • There are no added preservatives – so you can be sure you are not eating anything that isn’t natural
  • Its is completely delicious and you will be able to convert mince pie haters to lovers which will make you feel fabulous!

I really hope you enjoy making this recipe.  I will soon be adding my pastry recipe, so that you can make the entire mince pie.  Let me know how you get along with this recipe and do send me your images, thoughts and any alterations/additions you make! ENJOY!

Image