Tag Archives: #fun

Shortbread SISTA’s… with some sisterly LOVE x

23 Jun

20130623-105240.jpgLast month I popped home… to the North, for a long weekend and we decided to have a family baking day.  My little sister was DYING to show me her shortbread recipe and as I had just purchased some cheeky little LOVE heart cutters, it seemed completely apt to get them out and make some sisterly shortbreads.

So, I do hope you enjoy the recipe, my little hand model and the abuse I got during this baking session… but we love each other really and its all part of the fun of baking!

We decided to play around with the shortbread recipe, so we made some plain shortbreads with cinnamon sugar on the top and then we made some chocolate shortbreads, which were wonderful and last but not least some almond and cinnamon shortbreads.  All of them were absolutely delicious and very quick / easy to prepare

PREPARATION TIME: 8 minutes (per batch)

COOKING TIME: 20 minutes (per batch)

MAKES: 8 shortbreads (per batch, we made 3 batches as per the below!)

INGREDIENTS:

Gemma’s basic shortbreads, which follow the 3 to 2 to 1 recipe…

  • 150g plain flour
  • 100g butter
  • 50g sugar

…We added cinnamon sugar to the top of these, so mix 50g brown sugar with 2 tsp cinnamon and then sprinkle over the top before baking.

Rebecca’s chocolate  shortbreads…

  • 150g plain flour
  • 100g butter
  • 50g sugar
  • 80g dark chocolate / milk chocolate /white chocolate (broken up into bits)

SallyAnn’s almond and cinnamon shortbreads…

  • 100g plain flour
  • 50g ground almonds
  • 100g butter
  • 50g brown sugar
  • 50g flaked almonds
  • 2 tsp cinnamon

… you could add the cinnamon sugar to the top of these too, just for some extra tastiness.

HOW TO MAKE THE LOVELY SHORTBREADS…

You definitely don’t have to make all three batches of these shortbreads, you could just choose one and have a go.  They really are one of the most simple recipes I have ever made.  At first, when my sister suggested it I was concerned that they would take a long time to prepare as my perception was that shortbreads are quite a tricky, fiddly thing to make, but they really really are not and as we demonstrated you can play around with the ingredients and add whatever you like.  We did not follow a recipe for the chocolate / almond shortbreads, we just got a few ingredients out of the cupboard and had a go (which I think is the fun of baking).

I would urge anyone who is a keen baker to start experimenting with recipes and flavours, it really adds a new dimension to baking and I think its something that has really changed my baking style over the last year and using a new ingredient is not something that phases me.  When I next make these shortbreads I am going to play around with a home-made apple purée and apricots/almonds or even one batch with dates.

  1. Weigh out the butter and place this in a large bowl.
  2. To this add the sugar.
  3. Cream together the butter and the sugar.
  4. Weigh out the flour and add this to the mixture.
  5. Bring together into a smooth, thick paste.

If at this stage you have made a double/triple batch of this mixture then separate out and add whatever fillings you like either chocolate or almonds or apricots.  I am going to show you (with the help of my hand model) how to make these shortbreads.

20130623-092824.jpg

First, flour your worktop.

20130623-092853.jpg

Take your shortbread dough out of the bowl and then shape gently into a round.

20130623-092909.jpg

Pat down a little.

20130623-092923.jpg

Roll out…. Roll 3 times one way and then turn 90 degrees. Roll again and then rotate again.

20130623-092938.jpg

Roll out until the dough is about 1cm to 1.5cm thick.

20130623-093000.jpg

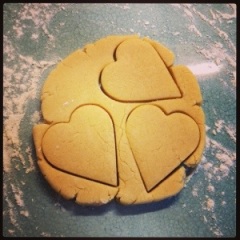
Now you can cut out your shortbreads into whatever shape you desire. We choose love hearts (to use my new cutters). If you don’t have a cutter, you could use a stencil like the one below…

heartpattern

Use this stencil if you want to make love hearts and don’t have a cutter!

20130623-093040.jpg

Cut out all your shapes and then gently remove from the dough. Bring the dough that is left together, but DO NOT PLAY WITH. Literally bring into a lump/ball and then place to one side.

20130623-093054.jpg

Place gently on your baking tray. Line the baking tray with a non-stick sheet, but if you don’t have one of these use butter to grease the tray.

20130623-093106.jpg

If you want to make chocolate ones, add the chocolate and then bring together into a dough.

20130623-093117.jpg

Roll to 1cm to 1.5cm then cut out…

20130623-093143.jpg

Space evenly on the baking tray and then, if you are sprinkling with sugar, do this at this stage, before you bake the shortbreads. Bake in the oven at 180 degrees / gas mark 4 for 15 to 20 minutes, until golden but not brown. You want them to be doughy/soft inside, not hard and crunchy!

20130623-093134.jpg

Now it is time to tidy up!!

I hope you shortbreads turn out well… I shall leave you with some of the silliness that happened whilst we were baking!  And no… piggybacking was not offered… I was JUMPED on.  When asked if I could have a piggyback I was told ‘Oooo no, really, but your the big sister who is supposed to give the little sister piggybacks.  Little sisters can’t give them to big sisters as they are BIG‘.  Charming.

20130623-093226.jpg20130623-093205.jpg20130623-103626.jpg20130623-104019.jpg

Making a meal of it… PANCAKES GALORE! (…with very childish, but very yummy fillings!)

16 Jun

20130614-162750.jpgSo, the British summertime is officially here… well in terms of the month in the year it is… June. But, as we are all very much aware we are seriously lacking the summer weather to go with it. Some of us will have holidays booked, ready to jet off in search of the summer sun, but some of us will have been looking forward to simply soaking up the sun in our back gardens, which won’t be happening in the near future. Sorry to dash your hopes and dreams those of you who have bought the lotion ready for the weekend…

I am therefore offering you this recipe as a solution to that ‘rainy day’ with the family. It is actually something I made on pancake day this year for my friends (I am a little bit of a child at heart), so I thought it would be fun to make something inspired by my childhood.

Do you remember ‘Findus Crispy Pancakes’? I do, and a few years ago Hugh Fearnley-Whittingstall made these little gems on ‘River Cottage’ which made me think… I can do that too! Hugh made his with quite adult, modern day fillings, but I regressed straight back to my 8 year old self and made baked beans and sausage pancakes; and bacon in a cheesy sauce. The fillings though can be completely up to you… you can put in whatever YOU like. I shall offer up some suggestions at the end.

My versions of this recipe are not healthy, I warn you. They are about having fun with food and enjoying food. If you want to make a healthy filling i.e. sweet potato mash, white sauce and bacon with broccoli – there is no reason why you could not do this. You could make bolognaise and pop that in, or chilli (see my chilli recipe) or even meatballs (see my meatball recipe). The world is your oyster when it comes to this. The only fillings you cannot use – or I would advise you not to use are soups or salads. The first will not hold well as a filling and life could get VERY messy. The latter would be disgusting/wilted once baked, so do tread with a little caution!

PREPARATION TIME: 1 hour

COOKING TIME: 20 minutes

MAKES: 12 – 16 pancakes (depending on how large/small, thick/thin you make them)

INGREDIENTS

For the pancakes…

  • 200g plain flour
  • pinch salt
  • 2 large eggs
  • 200ml semi-skimmed milk
  • 75ml water
  • Butter (for the pan)

For my favourite fillings and the crunchy coating…

  • 1 box of cheap cornflakes
  • 4 eggs
  • 1 tin of your favourite baked beans
  • 1tbsp tomato puree
  • black pepper (to taste)
  • 4 sausages
  • 1tbsp butter
  • 3 tbsp plain white flour
  • 200ml semi-skimmed milk
  • 80g mature cheddar cheese
  • 6 rashers of bacon (any bacon will do – streaky, plain, smoked)

HOW TO MAKE THESE DELICIOUS, SLIGHTY NAUGHTY PANCAKES…

First of all you need to make the batter for the pancakes and then cook each pancake in a frying pan as per my pancake recipe in ‘how did you have yours!?’.

Once the pancakes are cooked and they are cooling (it is best to use them when they are cool as they will be easier/safer for you to handle), you can start to prepare the filling.

20130214-055049.jpg

My lovely, pancake just golden and very nearly perfectly round! Pile yours up on a plate as you make them and pop to one side to cool…

The first one ‘beans and sausages’ is a slightly more adult version of the traditional beans and sausages, as it uses proper sausages not those weird tinned processed ones! So, take the skins of your sausages and then cut them into small pieces. Coat each piece of sausage with a little flour. Heat the frying pan so it’s warm and then drop the sausage pieces into the pan. You do not need to add oil. Once the sausage starts to cook it will release its own oil. Once the little bits of sausage have turned golden add the baked beans, the tomato puree and black pepper to taste. Mix well and cook until approx. half the liquid in the baked beans has evaporated out of the beans (my younger sister refers to this as ‘bean juice’). You want them to be a little drier so the filling doesn’t just run out.

Place this filling to one side and prepare filling number two…

In a pan melt the butter and to this add the plain flour. Mix these together, you should get a paste. To this add a dash of milk and mix until smooth, repeat until the butter/flour mix is more like the consistency of a thick sauce, with no lumps and then add the remainder of the milk and stir. Add the grated cheese and stir. Place this over a low heat and stir continually. After about 10 minutes the cheese will have melted and the sauce should have thickened considerably. If you don’t stir constantly you could get lumps in the sauce, which you don’t want, so use a figure of 8 motion to stir ensuring you get all the sides of the pan. Once thickened, urn off the heat and cover with a damp towel, so it does not get a skin. You could also use clingfilm, but be careful as the pan will be very hot.

Cook the bacon as you like it – in a frying pan (don’t add oil) or under the grill. Allow to cool and then cut into chunks. It is easiest to do this using a pair of scissors as once the bacon is cooked it is harder to chop. Place the bacon bits into the slightly cooled white sauce, add some black pepper to taste and then stir. The sauce should have thickened even more now it has cooled a little.

Now your fillings are ready, you can start to assemble the pancakes!

HOW TO FILL THE PANCAKES…

Take one pancake and one of your fillings. Place the pancake on a chopping board or plate and using a spoon, spoon about 2 tablespoons of the filling onto one side (only) of the pancake.

20130214-055101.jpg

I choose to use the baked bean and egg filling here to add to my pancake. As you can see its just in half the pancake, and the shiny bit around half of the edge of the pancake is the egg… ready to glue the over half down!

Whisk 2 eggs in a cup using a fork and then, using a pastry brush, brush some of this egg around where you have place the filling in a half moon shape around the edge of the pancake. You only need to egg ½ the edge of the pancake not the whole thing, as then you can fold the other half over and stick it down – the egg will act as the glue. Repeat this with the pancakes and the fillings until all of your fillings are used up.

20130614-160938.jpg

You will now have lots of pancakes that have a filling in and look like this… They need their coats on. This is the exciting/messy bit which makes them crunchy and yummy!

I only put one filling in my pancakes, but you could go crazy and mix them up – just a note, if you are doing this ensure the fillings go together!

HOW TO COAT THE PANCAKES…

You will probably have some whisked egg left, so add the other 2 eggs to this and whisk. Pour this out onto a large plate.

On another large plate crunch up/crush about 4 handfuls of cornflakes. You want the cornflakes to be crushed a bit, as a cornflake is quite large and will not stick as well as lots of little bits will.

20130214-055135.jpg

The pancakes will now be coated on each side with crunched up cornflakes and they are ready to be baked in the oven…

Now you have 2 plates, one with whisked eggs on and another with cornflakes on. Take one of the filled pancakes and carefully place it in the egg mixture. Turn it over so both sides are coated in egg and then gently lift the pancake out and place it in the crushed cornflakes. Turn it over and once both sides are nicely coated, you can take it out of the cornflakes and place it on a baking tray. Repeat this until all your filled pancakes are coated and then bake in the oven for 15 minutes at 180 degrees/gas mark 4. You want the pancakes and the cornflakes to turn golden and for the filling to be heated through.

Serve your pancakes with a salad, some coleslaw or if you are being naughty just as they are! Enjoy!

20130614-160802.jpg

This is how they should look once they have been baked in the oven… golden and crispy!

OTHER FILLINGS…

My versions of this recipe are not healthy, as you will have very much gathered. They are about having fun with food and enjoying food. If you want to make a healthy filling i.e. sweet potato mash, white sauce and bacon with broccoli – there is no reason why you could not do this. You could make bolognaise and pop that in, or chilli (see my chilli recipe) or even meatballs (see my meatball recipe). If you like fish, you could make the white sauce recipe above that I made and then to this add a selection of fish – white fish would work well, or salmon; or you could go very fancy and use some prawns and make a seafood filled pancake! You could make a curry and rice – or use a leftover curry from the night before!? The world is your oyster when it comes to this.

The only fillings you cannot use – or I would advise you not to use – are soups or salads. The first will not hold well as a filling and life could get VERY messy. The latter would be disgusting/wilted once baked, so do tread with a little caution!

If you want to see how Hugh did it with the River Cottage team, you can have a look here. But I think my version is best… as I would!

…a little less frugal and a lot more indulgent *ROASTED VEG, CHICKPEA & FETA COUSCOUS*

6 May

couscous 1

I love the roasted vegetable couscous recipe I uploaded yesterday, as a potential recipe in my ‘living below the poverty line on £1 a day challenge’, but as I mentioned there are a few things I would do differently if I were not trying to cut corners and make this recipe as cheap as I possibly could.

I understand and appreciate that there are people in our country who are not as fortunate as I perhaps am, and would only just be able to afford my 59p recipe never-mind this slightly more indulgent recipe.  But yesterday I was thinking to myself what the cost of a bottle of water is in my local supermarket (approx. 89p) and what I paid last week for a lemon water drink (£1.95) when I was gasping for a drink in central London and it was all I could find.

I was actually pretty shocked at this and thought if I am paying £1.95 for a drink which lasted me half an hour and simply quenched my thirst, then surely I could spend a little more to make this lunch even more healthy, nutritious and enjoyable whilst still only spending a pound or so a day for my lunches.

I have friends who pop to Pret each day for a sandwich, drink and bag of crisps, this must cost around £7 each day?  And, I know others who pop to our local salad bar at lunch for a £4.50 a day salad.  None of these my budget will allow for, but this recipe with a few additions it will, so by goodness I am going to go all out!  Get ready folks we are about to get a little more jazzy with the couscous…

PREPARATION TIME: 15 minutes

COOKING TIME: 30 minutes

MAKES: 4 portions

COST: £1.07 per portion – which is quite a significant difference to my £0.59 recipe, but it is still much better than buying one drink for £1.95 or lunch for £4.50.  Eating this for lunch for 4 days would be do-able and actually it would make for a cheap lunch, in comparison to what you could be paying for this in a restaurant.

INGREDIENTS:

  • 250g couscous – this costs £1.25 in Tesco’s for 500g, so although you would need to buy the whole bag, you would only need half of it, which would make it 63p . Try to find the whole-wheat version for a slightly healthier version.
  • 1 and a half red peppers – now this cost me 80p per pepper as I bought it from my local Sainsbury’s.  You could shop around for this and get it for a lot cheaper in a local grocery shop or market stall (the bowls of peppers for £1 will get you 3 or 4 peppers). Mine cost me £1.20.
  • 2 red onions – look through all the bags/onions and ensure you get a large one if they are all the same price, this is what I do!  60p
  • 2 courgettes – I bought a packet with 2 courgettes in for £1
  • 1/2 a tin of chickpeas (200g) – I shopped around for these a little and found them at Asda for 62pI think these may be cheaper to buy somewhere like Aldi.  It is much cheaper to buy these dry and soak them yourself, though this will add some extra time to the preparation of this recipe, as they will need to be soaked overnight. So these cost me 36p.
  • 1/2 a lemon – it was 30p for a whole one (again shop around and you will get this cheaper!) 15p
  • 2 cloves of garlic – the bulb was 20p so approx. 2p
  • 1 stock cube – it was £1.09 for 8 stock cubes so this makes it 14p per stock cube
  • 300ml boiling hot water – this one you can have for free as we all have the right to water and I am sure you can make it hot (there has to be some cutting of corners here)
  • 80g of vintage/aged feta cheese – I have choose a vintage version of this as it will have a deeper/stronger flavour and therefore you will need less cheese to get the flavour and consequently it will be slightly healthier.  Feta cheese is quite expensive, but the cheapest I have found was in Waitrose (ummmmm I know!) for £1.69 for 250g, so for this recipe I spent 54p
  • 15 mint leaves – very specific I know, but if you roll these up like a cigar and then finely chop them, they are an excellent flavour enhancer, but too much and we have mint couscous and nothing else.  A bag of mint leaves was 80p, so use about 1/3 of this and it will cost approx. 26p
  • 1 tbsp olive oil – this is a general store cupboard ingredient so we aren’t going to cost this one (as I am also running out of money!)
  • 2 tsp chilli flakes (again a store cupboard ingredient!)
  • 2 tsp paprika (store cupboard ingredient)

HOW TO MAKE THE ROASTED VEGETABLE COUSCOUS…

First we need to make the couscous, so make up the stock using boiling water and dissolving the stock cube in this.  Then weigh out the couscous, place in a large bowl and pour the stock over the top.  Cover with a clean tea towel and place to one side.

Wash the vegetables and then chop them into slices… they can be left quite large at this stage.  Peel the garlic cloves, peel the onion and chop into quarters and leave in its quarters (otherwise it will burn).  Drizzle with 1 tbsp olive oil, 2 tsp chilli flakes and 2 tsp of paprika and rub together to ensure all the ingredients are coated in spices and oil.

couscous 3

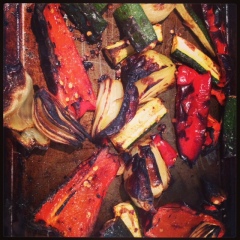
Roughly chopped vegetables coated in olive oil, paprika and chilli flakes.

Bake in the oven for 20 minutes until all the vegetables are soft, slightly brown/golden but definitely not burnt.  Allow them to cool, whilst you use a fork to break up the couscous, mix this well and then we can ‘mince’ all of the vegetables.

couscous 4

… beautifully roasted vegetables – even if I do say so myself!

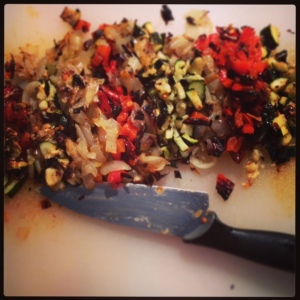
Mincing is a chopping technique, so place all your vegetables (and garlic) onto a chopping board and then, using a large knife ‘rock’ the knife over the top of them in different directions, until all the vegetables are finely diced/minced.  Add these to the couscous.

couscous 5

My roasted vegetables once ‘minced’… look at those fabulous colours. YUM!

Now we are going to make the dressing, so in a small bowl zest 1/2 the lemon, then roll it on your chopping board using the palm of your hand to release the juices.  Chop in half and squeeze the juice of 1/2 a lemon into the bowl.  To this add 1 tbsp olive oil and mix well.  Roll your mint leaves into a cigar shape and then finely chop these, you can use the rocking technique to make them even smaller and then add to the olive oil and lemon mixture. Pour this over the vegetables and the couscous, then open your tin of chickpeas, drain, add to the mix.

Finally crumble your 80g of feta cheese into the couscous, mix well and then we are DONE!  Now you can enjoy this lovely hearty roasted vegetable couscous…

couscous

From humble beginnings to a delicious, nutritious meal with all of our food groups… dairy, carbohydrates, protein, fruit and vegetables; and a little fat/sugars, but good fats from the olive oil. DONE!

Live Below the Line – Part 1: Roasted Veg & Chickpea Couscous

5 May

couscous 2I have been quite inspired this month hearing from friends and colleagues who are embarking on the challenge of living on £1 a day.  My initial thoughts were ‘pah… no way, I love food and I just could not do it’.  And then my mind started wandering and questioning my initial thinking…

… of the foods I make, how much do they actually cost per portion?  If I were to do this would I in effect be ‘dieting’ slightly?  Could this challenge be beneficial to my health?  I may eat more vegetables than I normally do? Other people have to do it, so why can’t I?  Could I help others who are have to live off £1 a day by providing some recipes? … and so it continued.

Having plagued myself with questions about the ‘living below the poverty line challenge’ for the last 2 weeks I have decided it may not be so bad after all and maybe, just maybe I could forgo some meals out with friends.  It would also help me save a little money on food and it would definitely be healthier, as I would not be able to eat very much cheese or cake and would need to use more vegetables and lentils.  So, when cooking dinner at home over the last week I have been pondering some of the more ‘simple’ recipes I make and really enjoy when times are getting slightly harder.  Such as my roasted vegetable couscous salad, pitta bread pizzas, quick pasta dishes and my all time favourite healthy/cheap meal in its self – soup.

I have decided to set myself the challenge of creating some healthy, meat free meals over the next few weeks, so I am going to be collecting a few of my favourite quick, easy and cheap recipes and trying them out, here, with you.  Ultimately some may not work and yes, I will be eating the resultant meal for the next week, but hey… we are living on a budget aren’t we folks?

If this all goes swimmingly and I find some lovely recipes (some will have to be desserts as I cannot live without the odd sweet treat) then I will complete the challenge myself in July and see if it is indeed possible when living in London, trying to be a sociable and seeing friends for drinks/dinner and simply enjoying life.  I think it may well be…

Without further ado, lets have a look at this little ROASTED VEGETABLE COUSCOUS recipe I love…

PREPARATION TIME: 15 minutes

COOKING TIME: 30 minutes

MAKES: 5 portions

COST: 59p per portion (this is quite expensive, more so that I thought when embarking on this challenge… I am a little disappointed).

INGREDIENTS:

  • 250g couscous – this costs £1.25 in Tesco’s for 500g, so although you would need to buy the whole bag, you would only need half of it, which would make it 63p
  • 1 red pepper – now this cost me 80p as I bought it from my local Sainsbury’s.  Part of this challenge is definitely about where we shop, so perhaps we could shop around for this and get it for a lot cheaper in a local grocery shop?
  • 1 red onion – look through all the bags/onions and ensure you get a large one if they are all the same price, this is what I do!  30p
  • 1 courgette – I bought one as the ones it packets all seemed smaller but more expensive, buying items when they are loose is definitely best for the budget, so this cost me 33p
  • 1 tin of chickpeas – I shopped around for these a little and found them at Asda for 62p.  I think these may be cheaper to buy somewhere like Aldi or Liddle.  It is much cheaper to buy these dry and soak them yourself, though this will add some extra time to the preparation of this recipe, as they will need to be soaked overnight.
  • 1/2 a lemon – it was 30p for a whole one (again shop around and you will get this cheaper!) 15p
  • 2 cloves of garlic – the bulb was 20p so approx. 2p
  • 1 stock cube – it was £1.09 for 8 stock cubes so this makes it 14p per stock cube
  • 300ml boiling hot water – this one you can have for free as we all have the right to water and I am sure you can make it hot (there has to be some cutting of corners here)
  • 1 tbsp olive oil – this is a general store cupboard ingredient so we aren’t going to cost this one (as I am also running out of money!)
  • 1 tsp chilli flakes (again a store cupboard ingredient!)

HOW TO MAKE THE ROASTED VEGETABLE COUSCOUS…

First we need to make the couscous, so make up the stock using boiling water and dissolving the stock cube in this.  Then weigh out the couscous, place in a large bowl and pour the stock over the top.  Cover with a clean tea towel and place to one side.

Wash the vegetables and then chop them into slices… they can be left quite large at this stage.  Peel the garlic cloves, peel the onion and chop into quarters and leave in its quarters (otherwise it will burn).  Drizzle with 1 tbsp olive oil, 1tsp chilli flakes and rub together to ensure all the ingredients are coated in chilli and oil.

couscous 3

Roughly chopped vegetables coated in olive oil and chilli flakes.

Bake in the oven for 20 minutes until all the vegetables are soft, slightly brown/golden but definitely not burnt.  Allow them to cool, whilst you use a fork to break up the couscous, mix this well and then we can ‘mince’ all of the vegetables.

couscous 4

… beautifully roasted vegetables – even if I do say so myself!

Mincing is a chopping technique, so place all your vegetables (and garlic) onto a chopping board and then, using a large knife ‘rock’ the knife over the top of them in different directions, until all the vegetables are finely diced/minced.  Add these to the couscous.

couscous 5

My roasted vegetables once ‘minced’… look at those fabulous colours. YUM!

Now we are going to make the dressing, so in a small bowl zest 1/2 the lemon, then roll it on your chopping board using the palm of your hand to release the juices.  Chop in half and squeeze the juice of 1/2 a lemon into the bowl.  To this add 1 tbsp olive oil and mix well.  Pour this over the vegetables and the couscous, then open your tin of chickpeas, drain, add to the salad and we are DONE!  Now you can enjoy this lovely hearty roasted vegetable couscous…

couscous 6

Roasted Vegetable & Chickpea Couscous… DONE!

EVALUATION:

Overall the recipe looks and tastes great.  I am not sure I felt ‘full’ after eating this, but I think that, that is a feeling I will just have to get used to on the £1 a day diet.  If I were making this normally for my lunch/dinner I would probably have a little feta cheese with it (no more than 20g) or I would serve it alongside some chicken/fish (without the chickpeas).  So, it was a little odd eating it couscous alone for my lunch, though the chickpeas bulked the recipe out, filled me up a little more than just the vegetables and couscous would have done and added some much needed protein.  The flavours from the lemon, chilli, garlic and roasted vegetables really made this recipe tasty and delicious.

The overall cost has upset me… 59p per portion really is not good, as that leaves me 41p for the rest of the day.  I would have to ensure my dinner was very cheap (I am thinking a simple soup) and that my breakfast was a porridge without fruit.  I do however think that if I shopped around a little I could make this recipe much cheaper, so tomorrow I am going to pop to a fab little grocery shop near work and see if I can beat this budget.  I will update this recipe in due course.

couscous

I shall see if I can get all these ingredients cheaper and when/if I do, I shall update the recipe costs below.

Recipe one done!  Now… what next…

WARNING: This recipe is NAUGHTY, but BOY they taste good… *MARS BAR CAKES*

28 Mar

20130328-091952.jpg

This week, I got a real craving for something naughty, but nice.  So, with it being Easter and having a large box of cornflakes at home, yet to be eaten, I thought…

…‘I know, MARS BAR CORNFLAKE CAKES’.

I ran home, purchased my ingredients and got to it.  Within 10 minutes I had made these little beauties, ready for my dessert.  They really didn’t take any time at all and they taste absolutely delicious.  I know my blog promises ‘healthy, nutritious foods’, which this recipe absolutely is not, but I think it is really important (as part of a healthy balanced diet), to know when a treat is acceptable. And, it TOTALLY is.

This is a great recipe to make with children, as it is no bake.  Though, I would suggest that the adult does the majority of the melting – steam can burn just as badly as water – so please do be cautious.

PREPARATION TIME: 10 minutes (this could take anything up to 30 minutes with little hands!)

COOKING TIME: N/A

MAKES: 12 mars bar cornflake cakes

INGREDIENTS:

  • 3 mars bars (standard size)
  • 50g milk chocolate
  • 30g butter
  • 1 tbsp golden syrup
  • 4 large handfuls of cornflakes – slightly crushed (you can add more or less if you like depending on how chocolate-y you want them!)
  • 12 mini eggs (you can eat the others!)

HOW TO MAKE THE MARS BAR CORNFLAKE CAKES…

This recipe is so simple.  The first thing you need to do is place 3cm of water in a medium sized pan and then heat this up – so that the water begins to boil.  Turn the heat down and allow it to simmer.

In a bowl place the chopped up mars bars, broken up milk chocolate, butter, golden syrup and then place the bowl on top of the pan of hot water.  The heat from the water should heat the bowl and melt all the ingredients together.

You will have to stir the chocolate/butter/mars bar mix, so hold the bowl with an oven glove and do this gently.  The mixture may curdle to start with, but after this it will all come together nicely.

Remove the bowl containing the melted chocolate from the heat and to this add the cornflakes.  As you add them crush them just slightly – this will make it easier to mix together.

Mix the chocolate and cornflakes together – don’t worry if some break.

Spoon the mixture into your cupcake cases (it should make about 12 cakes) and then add a mini-egg to the top of the ‘nest’ you have created.

Leave to cool and then eat!  They will be quite sticky and gooey… which is just what you want!  HAPPY EASTER from gemsfoodgems.

This is how the finished cornflake cake should look... YUM! HAPPY EASTER!

This is how the finished cornflake cake should look… YUM! HAPPY EASTER everyone!