Archive | June, 2013

Live Below the Line: Tasty vegetable & BARLEY (but a little bit ugly) SOUP, ready for winter…July

28 Jun

20130628-070300.jpgSoup… a way to save money, loose a little weight and boost my vegetable intake.  So, why not!  I love soup, I really really do.  I hate soup when my tuppawear opens and it leaks all over my bag, but this is a very rare occurance and it is the ONLY time I dislike soup.  I cannot think of any reason why people should not make it and eat it in summer… it lasts in the fridge, the taste increases (for the better) overtime and I just love it… as I am sure you will to.

I think soup is a traditionally quite a nothern staple.  I know as a little girl we were served a smooth vegetable soup as soon as my mum thought one of us had even a slight cold (evidenced by a little cough or a sneeze that she noticed and prayed upon).  Rather than it being a torturous occasion to have this soup, we would relish it and if we were really good mum would either make some homemade bread to go with it, some baked chicken wings or (my personal favourite) a little cheese on toast.  I have  (over the years of living away from home) tended to experiment with soups and now, as an adult, see them as a great way to boost my vitamins, minerals and even my fibre intake – with added pearl barley.  I am also more than happy to order them for dinner in a restaurant, as they are generally inexpensive, heart warming and really really filling.

I love pearl barley, nearly as much as I love soup.  It really bulks out a dish, but it is a wholegain and is great for your digestive system, as it is high in fibre and wholegrain goodness (extra B vitamins and some essential fatty acids).  It is also very cheap and if fills me up, so there is not much more that I could want from a food product!  If you haven’t cooked with it before, there really is no need to worry.  It is extremly simple to use, you just need to ensure you cook it until it is soft (like rice!).

I have decided to make this recipe a part of my ‘Live Below the Line’ series, as it really is THAT cheap to make.  You don’t even have to add the chicken (maybe just add some more veg if you don’t) but if you don’t have a lot of money and want something wholesome, healthy and low in calories, high in nutrients then you really don’t have to look any further… here we go!

PREPARATION TIME: 10 minutes

COOKING TIME:  45 minutes

MAKES: 4 portions

COST: 42p per portion (without the chicken it would be cheaper at 20p per portion)

INGREDIENTS:

  • 2 chicken thighs or 3 drumsticks (£3.00 for 6 thighs, so £1 for 2 – you could use a wing or drumstick, I prefer to buy de-boned thighs just to save me some time but using the drumsticks would cost about 88p)
  • 1 chicken stock cube (10p)
  • 2 carrots (12p)
  • 1 potato, or 5 new potatoes with the skin on (28p – see if you can buy them singulary or if there are any offers on large bags or reductions)
  • 1 large onion (if you buy a large bag of about 16 onions for £1 then use 2 of these as they are a little smaller – this will set you back about 12p)
  • 1 cup of pearl barley (59p for a 500g bag of this and you will need about 150g of dried pearl barley, so this will cost 17p)
  • Water (to cover, about a litre)
  • Black Pepper (to taste – a store cupboard ingredient)

HOW TO MAKE THE CHICKEN & BARLEY SOUP…

The first thing to do is to finely dice your carrots and your onions and pop them in a large pan.  To this add a dash of olive oil and cook for 5 minutes until they are just start to soften.

Whilst the carrots and onions cook, soak the pearl barley in a bowl with boiling water and place to one side (for about 20 minutes).

Add the chicken, and the stock cube to the pan and then cover with water.  If you are using a medium sized pan, fill the pan until the water level comes to about 2cm below the top (it should be about a litre, but you may need more – it depends if you want a thick chunky soup or a slightly more watery, soup).  Place a lid on and bring to the boil.  Once boiling reduce the heat and simmer for 30 minutes.  At this point the chicken should be cooked, so remove from the pan and place on a chopping board.  You need to cool the chicken down, so that you can shred it.  If you do this whilst it is still hot you will have very sore hands!

The pearl barley should now have softened a little, so pour into a sieve and then rinse until the water runs clear.  This will mean you have removed some of the starch, which is fine.  Add this to the soup and again return the soup to the boil.  Dice the potatoes (with the skins on for extra fibre) and then add to the pan.  You need to cook this until the pearl barley is soft… it’s a little like cooking rice.  If you don’t cook it through it has a hard centre which tastes bitty and unpleasant.  It will take about 20 to 30 minutes for the pearl barley to soften, so once boiling, reduce to a simmer and continue to cook.

Once the chicken is cooled, remove the skin and discard, then shred using a fork (or your fingers… after all they were they best tools we were born with) and then add this back into the soup.  Discard the bones and continue to cook the soup until all the vegetables etc. are soft.  I would add my pepper with about 5 – 10 minutes of the cooking time left and then taste to ensure I have added enough.

This soup should not be blended to a smooth consistency – which is why it is important to dice the vegetables nice and small.  Then serve… use a nice bowl to make it look a little prettier and if you wish serve with some nice chunky brown bread.  YUM!

20130628-070337.jpg

The finished soup! I know it does not look that appetising, but that is because everything (the pearl barley) has sunk to the bottom and is all I could photograph was the watery soup… believe me it TASTES AMAZING!

Shortbread SISTA’s… with some sisterly LOVE x

23 Jun

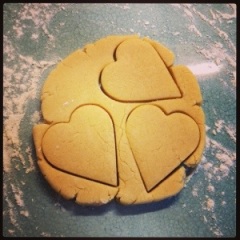
20130623-105240.jpgLast month I popped home… to the North, for a long weekend and we decided to have a family baking day.  My little sister was DYING to show me her shortbread recipe and as I had just purchased some cheeky little LOVE heart cutters, it seemed completely apt to get them out and make some sisterly shortbreads.

So, I do hope you enjoy the recipe, my little hand model and the abuse I got during this baking session… but we love each other really and its all part of the fun of baking!

We decided to play around with the shortbread recipe, so we made some plain shortbreads with cinnamon sugar on the top and then we made some chocolate shortbreads, which were wonderful and last but not least some almond and cinnamon shortbreads.  All of them were absolutely delicious and very quick / easy to prepare

PREPARATION TIME: 8 minutes (per batch)

COOKING TIME: 20 minutes (per batch)

MAKES: 8 shortbreads (per batch, we made 3 batches as per the below!)

INGREDIENTS:

Gemma’s basic shortbreads, which follow the 3 to 2 to 1 recipe…

  • 150g plain flour
  • 100g butter
  • 50g sugar

…We added cinnamon sugar to the top of these, so mix 50g brown sugar with 2 tsp cinnamon and then sprinkle over the top before baking.

Rebecca’s chocolate  shortbreads…

  • 150g plain flour
  • 100g butter
  • 50g sugar
  • 80g dark chocolate / milk chocolate /white chocolate (broken up into bits)

SallyAnn’s almond and cinnamon shortbreads…

  • 100g plain flour
  • 50g ground almonds
  • 100g butter
  • 50g brown sugar
  • 50g flaked almonds
  • 2 tsp cinnamon

… you could add the cinnamon sugar to the top of these too, just for some extra tastiness.

HOW TO MAKE THE LOVELY SHORTBREADS…

You definitely don’t have to make all three batches of these shortbreads, you could just choose one and have a go.  They really are one of the most simple recipes I have ever made.  At first, when my sister suggested it I was concerned that they would take a long time to prepare as my perception was that shortbreads are quite a tricky, fiddly thing to make, but they really really are not and as we demonstrated you can play around with the ingredients and add whatever you like.  We did not follow a recipe for the chocolate / almond shortbreads, we just got a few ingredients out of the cupboard and had a go (which I think is the fun of baking).

I would urge anyone who is a keen baker to start experimenting with recipes and flavours, it really adds a new dimension to baking and I think its something that has really changed my baking style over the last year and using a new ingredient is not something that phases me.  When I next make these shortbreads I am going to play around with a home-made apple purée and apricots/almonds or even one batch with dates.

  1. Weigh out the butter and place this in a large bowl.
  2. To this add the sugar.
  3. Cream together the butter and the sugar.
  4. Weigh out the flour and add this to the mixture.
  5. Bring together into a smooth, thick paste.

If at this stage you have made a double/triple batch of this mixture then separate out and add whatever fillings you like either chocolate or almonds or apricots.  I am going to show you (with the help of my hand model) how to make these shortbreads.

20130623-092824.jpg

First, flour your worktop.

20130623-092853.jpg

Take your shortbread dough out of the bowl and then shape gently into a round.

20130623-092909.jpg

Pat down a little.

20130623-092923.jpg

Roll out…. Roll 3 times one way and then turn 90 degrees. Roll again and then rotate again.

20130623-092938.jpg

Roll out until the dough is about 1cm to 1.5cm thick.

20130623-093000.jpg

Now you can cut out your shortbreads into whatever shape you desire. We choose love hearts (to use my new cutters). If you don’t have a cutter, you could use a stencil like the one below…

heartpattern

Use this stencil if you want to make love hearts and don’t have a cutter!

20130623-093040.jpg

Cut out all your shapes and then gently remove from the dough. Bring the dough that is left together, but DO NOT PLAY WITH. Literally bring into a lump/ball and then place to one side.

20130623-093054.jpg

Place gently on your baking tray. Line the baking tray with a non-stick sheet, but if you don’t have one of these use butter to grease the tray.

20130623-093106.jpg

If you want to make chocolate ones, add the chocolate and then bring together into a dough.

20130623-093117.jpg

Roll to 1cm to 1.5cm then cut out…

20130623-093143.jpg

Space evenly on the baking tray and then, if you are sprinkling with sugar, do this at this stage, before you bake the shortbreads. Bake in the oven at 180 degrees / gas mark 4 for 15 to 20 minutes, until golden but not brown. You want them to be doughy/soft inside, not hard and crunchy!

20130623-093134.jpg

Now it is time to tidy up!!

I hope you shortbreads turn out well… I shall leave you with some of the silliness that happened whilst we were baking!  And no… piggybacking was not offered… I was JUMPED on.  When asked if I could have a piggyback I was told ‘Oooo no, really, but your the big sister who is supposed to give the little sister piggybacks.  Little sisters can’t give them to big sisters as they are BIG‘.  Charming.

20130623-093226.jpg20130623-093205.jpg20130623-103626.jpg20130623-104019.jpg

Making a meal of it… PANCAKES GALORE! (…with very childish, but very yummy fillings!)

16 Jun

20130614-162750.jpgSo, the British summertime is officially here… well in terms of the month in the year it is… June. But, as we are all very much aware we are seriously lacking the summer weather to go with it. Some of us will have holidays booked, ready to jet off in search of the summer sun, but some of us will have been looking forward to simply soaking up the sun in our back gardens, which won’t be happening in the near future. Sorry to dash your hopes and dreams those of you who have bought the lotion ready for the weekend…

I am therefore offering you this recipe as a solution to that ‘rainy day’ with the family. It is actually something I made on pancake day this year for my friends (I am a little bit of a child at heart), so I thought it would be fun to make something inspired by my childhood.

Do you remember ‘Findus Crispy Pancakes’? I do, and a few years ago Hugh Fearnley-Whittingstall made these little gems on ‘River Cottage’ which made me think… I can do that too! Hugh made his with quite adult, modern day fillings, but I regressed straight back to my 8 year old self and made baked beans and sausage pancakes; and bacon in a cheesy sauce. The fillings though can be completely up to you… you can put in whatever YOU like. I shall offer up some suggestions at the end.

My versions of this recipe are not healthy, I warn you. They are about having fun with food and enjoying food. If you want to make a healthy filling i.e. sweet potato mash, white sauce and bacon with broccoli – there is no reason why you could not do this. You could make bolognaise and pop that in, or chilli (see my chilli recipe) or even meatballs (see my meatball recipe). The world is your oyster when it comes to this. The only fillings you cannot use – or I would advise you not to use are soups or salads. The first will not hold well as a filling and life could get VERY messy. The latter would be disgusting/wilted once baked, so do tread with a little caution!

PREPARATION TIME: 1 hour

COOKING TIME: 20 minutes

MAKES: 12 – 16 pancakes (depending on how large/small, thick/thin you make them)

INGREDIENTS

For the pancakes…

  • 200g plain flour
  • pinch salt
  • 2 large eggs
  • 200ml semi-skimmed milk
  • 75ml water
  • Butter (for the pan)

For my favourite fillings and the crunchy coating…

  • 1 box of cheap cornflakes
  • 4 eggs
  • 1 tin of your favourite baked beans
  • 1tbsp tomato puree
  • black pepper (to taste)
  • 4 sausages
  • 1tbsp butter
  • 3 tbsp plain white flour
  • 200ml semi-skimmed milk
  • 80g mature cheddar cheese
  • 6 rashers of bacon (any bacon will do – streaky, plain, smoked)

HOW TO MAKE THESE DELICIOUS, SLIGHTY NAUGHTY PANCAKES…

First of all you need to make the batter for the pancakes and then cook each pancake in a frying pan as per my pancake recipe in ‘how did you have yours!?’.

Once the pancakes are cooked and they are cooling (it is best to use them when they are cool as they will be easier/safer for you to handle), you can start to prepare the filling.

20130214-055049.jpg

My lovely, pancake just golden and very nearly perfectly round! Pile yours up on a plate as you make them and pop to one side to cool…

The first one ‘beans and sausages’ is a slightly more adult version of the traditional beans and sausages, as it uses proper sausages not those weird tinned processed ones! So, take the skins of your sausages and then cut them into small pieces. Coat each piece of sausage with a little flour. Heat the frying pan so it’s warm and then drop the sausage pieces into the pan. You do not need to add oil. Once the sausage starts to cook it will release its own oil. Once the little bits of sausage have turned golden add the baked beans, the tomato puree and black pepper to taste. Mix well and cook until approx. half the liquid in the baked beans has evaporated out of the beans (my younger sister refers to this as ‘bean juice’). You want them to be a little drier so the filling doesn’t just run out.

Place this filling to one side and prepare filling number two…

In a pan melt the butter and to this add the plain flour. Mix these together, you should get a paste. To this add a dash of milk and mix until smooth, repeat until the butter/flour mix is more like the consistency of a thick sauce, with no lumps and then add the remainder of the milk and stir. Add the grated cheese and stir. Place this over a low heat and stir continually. After about 10 minutes the cheese will have melted and the sauce should have thickened considerably. If you don’t stir constantly you could get lumps in the sauce, which you don’t want, so use a figure of 8 motion to stir ensuring you get all the sides of the pan. Once thickened, urn off the heat and cover with a damp towel, so it does not get a skin. You could also use clingfilm, but be careful as the pan will be very hot.

Cook the bacon as you like it – in a frying pan (don’t add oil) or under the grill. Allow to cool and then cut into chunks. It is easiest to do this using a pair of scissors as once the bacon is cooked it is harder to chop. Place the bacon bits into the slightly cooled white sauce, add some black pepper to taste and then stir. The sauce should have thickened even more now it has cooled a little.

Now your fillings are ready, you can start to assemble the pancakes!

HOW TO FILL THE PANCAKES…

Take one pancake and one of your fillings. Place the pancake on a chopping board or plate and using a spoon, spoon about 2 tablespoons of the filling onto one side (only) of the pancake.

20130214-055101.jpg

I choose to use the baked bean and egg filling here to add to my pancake. As you can see its just in half the pancake, and the shiny bit around half of the edge of the pancake is the egg… ready to glue the over half down!

Whisk 2 eggs in a cup using a fork and then, using a pastry brush, brush some of this egg around where you have place the filling in a half moon shape around the edge of the pancake. You only need to egg ½ the edge of the pancake not the whole thing, as then you can fold the other half over and stick it down – the egg will act as the glue. Repeat this with the pancakes and the fillings until all of your fillings are used up.

20130614-160938.jpg

You will now have lots of pancakes that have a filling in and look like this… They need their coats on. This is the exciting/messy bit which makes them crunchy and yummy!

I only put one filling in my pancakes, but you could go crazy and mix them up – just a note, if you are doing this ensure the fillings go together!

HOW TO COAT THE PANCAKES…

You will probably have some whisked egg left, so add the other 2 eggs to this and whisk. Pour this out onto a large plate.

On another large plate crunch up/crush about 4 handfuls of cornflakes. You want the cornflakes to be crushed a bit, as a cornflake is quite large and will not stick as well as lots of little bits will.

20130214-055135.jpg

The pancakes will now be coated on each side with crunched up cornflakes and they are ready to be baked in the oven…

Now you have 2 plates, one with whisked eggs on and another with cornflakes on. Take one of the filled pancakes and carefully place it in the egg mixture. Turn it over so both sides are coated in egg and then gently lift the pancake out and place it in the crushed cornflakes. Turn it over and once both sides are nicely coated, you can take it out of the cornflakes and place it on a baking tray. Repeat this until all your filled pancakes are coated and then bake in the oven for 15 minutes at 180 degrees/gas mark 4. You want the pancakes and the cornflakes to turn golden and for the filling to be heated through.

Serve your pancakes with a salad, some coleslaw or if you are being naughty just as they are! Enjoy!

20130614-160802.jpg

This is how they should look once they have been baked in the oven… golden and crispy!

OTHER FILLINGS…

My versions of this recipe are not healthy, as you will have very much gathered. They are about having fun with food and enjoying food. If you want to make a healthy filling i.e. sweet potato mash, white sauce and bacon with broccoli – there is no reason why you could not do this. You could make bolognaise and pop that in, or chilli (see my chilli recipe) or even meatballs (see my meatball recipe). If you like fish, you could make the white sauce recipe above that I made and then to this add a selection of fish – white fish would work well, or salmon; or you could go very fancy and use some prawns and make a seafood filled pancake! You could make a curry and rice – or use a leftover curry from the night before!? The world is your oyster when it comes to this.

The only fillings you cannot use – or I would advise you not to use – are soups or salads. The first will not hold well as a filling and life could get VERY messy. The latter would be disgusting/wilted once baked, so do tread with a little caution!

If you want to see how Hugh did it with the River Cottage team, you can have a look here. But I think my version is best… as I would!