Archive | Dinner Time RSS feed for this section

YORKSHIRE PUDDINGS… a Sunday Roast is not a Sunday Roast without them. Aunt Bessie eat your heart out!

14 Jul

20130628-073606.jpgAs per the title of this post, a Sunday Roast is not a Sunday Roast without YORKSHIRE PUDDINGS… and many of them.  Don’t get me wrong, I do love going out for a Sunday Lunch, however I only ever get ONE Yorkshire Pudding and I find that very very upsetting.

When I was a little girl Yorkshire Puddings were the thing we always argued every Sunday… and that was not just me and my little sister.  That was my Mum and Dad too!  My mum would make a ‘batch’ of yorkshire puddings.  Sometimes this would be 12 and as we got older it would be 16.  Then when Mark joined our family (my wee sisters other half) we started making 20.  So… ‘3 each’ or ‘4 each’ was the rule shouted as they were brought into the dining room.  During the meal we would ask each other ‘how many have you had?’ and we would systematically go around the table.  Sometimes LIES were told.  This would cause chaos… especially if you had simply and innocently forgotten how many you had (cough cough).

So… we grew up with Mum making Yorkshire Puddings every Sunday and therefore my sister and I are adept at making Yorkshire’s.  I therefore find it very ODD that people are shocked and amazed when I whip up a batch and don’t rely on Aunt Bessie’s fake, thin and skimpy puddings.  OH NO.  If I did that Mum would disown me, and rightly so.

In fact neither my sister nor I use a recipe, so this is going to be quite hard for me to write!  But here we go…

PREPARATION TIME: 10 minutes

COOKING TIME: 15 minutes

MAKES: 12 Yorkshire Puddings

INGREDIENTS:

  • 4 heaped tablespoons of plain flour
  • A pinch of salt
  • 1 egg
  • Milk (enough to make a smooth batter)
  • Vegetable oil / lard /butter

HOW TO MAKE THE PUDDINGS…

First things first and possibly the MOST important stage.  Get out the Yorkshire Pudding tin… which is the one that is smaller than a muffin tin and is used to bake buns not cupcakes.  (I hope this makes sense!)  To each well in the Yorkshire Pudding tin add 1/2 a teaspoon of oil/butter/lard.  I prefer to use vegetable oil as I don’t think it adds a taste to the puddings.  Now place this in a hot oven – so heat the oven to 200 degrees (gas mark 5) and then place in the tray with the oil.  You want to leave this to ensure that the oil is very hot, which should take about 10 minutes.  Whilst this heats up, lets make the batter…

In a medium sized bowl (or if you are like me I find it easier to use a measuring jug, as it will allow me to pour the mixture out neatly) place the 4 heaped tablespoons of plain flour in and add to that the pinch of salt (but only a pinch).

Mix together the salt and flour and then make a well in the centre – a hole!  (I say this to the children I work with and they look at me like I am crazy!!)  It simply means make a space in the centre.  Into here add the egg (obviously crack it open!) and then add a good glug of milk.  If you want some help here, about 6 tablespoons of milk – but it doesn’t matter if its slightly more or less at this stage.

Now, using a fork start whisking the egg and milk (only) in the centre.  Keep going and you will notice that gradually the flour starts to stick and come into the mix, keep going and going until a lot of the flour has come into the milk/egg now you should be starting to get a think paste… don’t let it get too thick as so far you will have avoided lumps.

Add a dash of milk and continue to mix.  Add another dash of milk and repeat.  You can now bring in the rest of the flour by mixing around the sides of the bowl and add another dash of milk.

The batter for Yorkshire Puddings and pancakes is the same, the only difference is the thickness.  For pancakes you want a very thin consistency, for puddings you want a thick batter.  So in between the consistency of houmous and pancake batter.  (Hummm this is hard to explain).  So keep adding milk until you get the batter to this consistency and whisk well to ensure there are no lumps.

Now your oil should be hot, so take the tin out of the oven (using a glove) and begin pouring in the batter.  You want to fill each well up until it is approx. two thirds full – this will allow room for rising.  You also need to act very quickly as you need the oil to be hot as the batter hits it.  So, fill each well and then get them puddings straight into the oven.

Leave for 15 minutes and DO NOT OPEN THE OVEN.  If you do they could drop and then you won’t get the impressive rise.  After 15 minutes open the oven and have a peak.  If they are golden they are ready.  I like mine a little doughy/heavy so I take them out after 15 minutes.  If you like them lighter in weight and darker in colour then leave them for another 5 minutes.

Add them to your roast dinner after declaring ‘2 each’ or ‘3 each’ and enjoy!  Any leftover batter (if you are cooking for one or two) could be used as pancakes… you just need to add more milk.  ENJOY and please… don’t fight.

20130628-073635.jpg

My finished YORKSHIRE PUDDINGS… GOBBLE GOBBLE!

Making a meal of it… PANCAKES GALORE! (…with very childish, but very yummy fillings!)

16 Jun

20130614-162750.jpgSo, the British summertime is officially here… well in terms of the month in the year it is… June. But, as we are all very much aware we are seriously lacking the summer weather to go with it. Some of us will have holidays booked, ready to jet off in search of the summer sun, but some of us will have been looking forward to simply soaking up the sun in our back gardens, which won’t be happening in the near future. Sorry to dash your hopes and dreams those of you who have bought the lotion ready for the weekend…

I am therefore offering you this recipe as a solution to that ‘rainy day’ with the family. It is actually something I made on pancake day this year for my friends (I am a little bit of a child at heart), so I thought it would be fun to make something inspired by my childhood.

Do you remember ‘Findus Crispy Pancakes’? I do, and a few years ago Hugh Fearnley-Whittingstall made these little gems on ‘River Cottage’ which made me think… I can do that too! Hugh made his with quite adult, modern day fillings, but I regressed straight back to my 8 year old self and made baked beans and sausage pancakes; and bacon in a cheesy sauce. The fillings though can be completely up to you… you can put in whatever YOU like. I shall offer up some suggestions at the end.

My versions of this recipe are not healthy, I warn you. They are about having fun with food and enjoying food. If you want to make a healthy filling i.e. sweet potato mash, white sauce and bacon with broccoli – there is no reason why you could not do this. You could make bolognaise and pop that in, or chilli (see my chilli recipe) or even meatballs (see my meatball recipe). The world is your oyster when it comes to this. The only fillings you cannot use – or I would advise you not to use are soups or salads. The first will not hold well as a filling and life could get VERY messy. The latter would be disgusting/wilted once baked, so do tread with a little caution!

PREPARATION TIME: 1 hour

COOKING TIME: 20 minutes

MAKES: 12 – 16 pancakes (depending on how large/small, thick/thin you make them)

INGREDIENTS

For the pancakes…

  • 200g plain flour
  • pinch salt
  • 2 large eggs
  • 200ml semi-skimmed milk
  • 75ml water
  • Butter (for the pan)

For my favourite fillings and the crunchy coating…

  • 1 box of cheap cornflakes
  • 4 eggs
  • 1 tin of your favourite baked beans
  • 1tbsp tomato puree
  • black pepper (to taste)
  • 4 sausages
  • 1tbsp butter
  • 3 tbsp plain white flour
  • 200ml semi-skimmed milk
  • 80g mature cheddar cheese
  • 6 rashers of bacon (any bacon will do – streaky, plain, smoked)

HOW TO MAKE THESE DELICIOUS, SLIGHTY NAUGHTY PANCAKES…

First of all you need to make the batter for the pancakes and then cook each pancake in a frying pan as per my pancake recipe in ‘how did you have yours!?’.

Once the pancakes are cooked and they are cooling (it is best to use them when they are cool as they will be easier/safer for you to handle), you can start to prepare the filling.

20130214-055049.jpg

My lovely, pancake just golden and very nearly perfectly round! Pile yours up on a plate as you make them and pop to one side to cool…

The first one ‘beans and sausages’ is a slightly more adult version of the traditional beans and sausages, as it uses proper sausages not those weird tinned processed ones! So, take the skins of your sausages and then cut them into small pieces. Coat each piece of sausage with a little flour. Heat the frying pan so it’s warm and then drop the sausage pieces into the pan. You do not need to add oil. Once the sausage starts to cook it will release its own oil. Once the little bits of sausage have turned golden add the baked beans, the tomato puree and black pepper to taste. Mix well and cook until approx. half the liquid in the baked beans has evaporated out of the beans (my younger sister refers to this as ‘bean juice’). You want them to be a little drier so the filling doesn’t just run out.

Place this filling to one side and prepare filling number two…

In a pan melt the butter and to this add the plain flour. Mix these together, you should get a paste. To this add a dash of milk and mix until smooth, repeat until the butter/flour mix is more like the consistency of a thick sauce, with no lumps and then add the remainder of the milk and stir. Add the grated cheese and stir. Place this over a low heat and stir continually. After about 10 minutes the cheese will have melted and the sauce should have thickened considerably. If you don’t stir constantly you could get lumps in the sauce, which you don’t want, so use a figure of 8 motion to stir ensuring you get all the sides of the pan. Once thickened, urn off the heat and cover with a damp towel, so it does not get a skin. You could also use clingfilm, but be careful as the pan will be very hot.

Cook the bacon as you like it – in a frying pan (don’t add oil) or under the grill. Allow to cool and then cut into chunks. It is easiest to do this using a pair of scissors as once the bacon is cooked it is harder to chop. Place the bacon bits into the slightly cooled white sauce, add some black pepper to taste and then stir. The sauce should have thickened even more now it has cooled a little.

Now your fillings are ready, you can start to assemble the pancakes!

HOW TO FILL THE PANCAKES…

Take one pancake and one of your fillings. Place the pancake on a chopping board or plate and using a spoon, spoon about 2 tablespoons of the filling onto one side (only) of the pancake.

20130214-055101.jpg

I choose to use the baked bean and egg filling here to add to my pancake. As you can see its just in half the pancake, and the shiny bit around half of the edge of the pancake is the egg… ready to glue the over half down!

Whisk 2 eggs in a cup using a fork and then, using a pastry brush, brush some of this egg around where you have place the filling in a half moon shape around the edge of the pancake. You only need to egg ½ the edge of the pancake not the whole thing, as then you can fold the other half over and stick it down – the egg will act as the glue. Repeat this with the pancakes and the fillings until all of your fillings are used up.

20130614-160938.jpg

You will now have lots of pancakes that have a filling in and look like this… They need their coats on. This is the exciting/messy bit which makes them crunchy and yummy!

I only put one filling in my pancakes, but you could go crazy and mix them up – just a note, if you are doing this ensure the fillings go together!

HOW TO COAT THE PANCAKES…

You will probably have some whisked egg left, so add the other 2 eggs to this and whisk. Pour this out onto a large plate.

On another large plate crunch up/crush about 4 handfuls of cornflakes. You want the cornflakes to be crushed a bit, as a cornflake is quite large and will not stick as well as lots of little bits will.

20130214-055135.jpg

The pancakes will now be coated on each side with crunched up cornflakes and they are ready to be baked in the oven…

Now you have 2 plates, one with whisked eggs on and another with cornflakes on. Take one of the filled pancakes and carefully place it in the egg mixture. Turn it over so both sides are coated in egg and then gently lift the pancake out and place it in the crushed cornflakes. Turn it over and once both sides are nicely coated, you can take it out of the cornflakes and place it on a baking tray. Repeat this until all your filled pancakes are coated and then bake in the oven for 15 minutes at 180 degrees/gas mark 4. You want the pancakes and the cornflakes to turn golden and for the filling to be heated through.

Serve your pancakes with a salad, some coleslaw or if you are being naughty just as they are! Enjoy!

20130614-160802.jpg

This is how they should look once they have been baked in the oven… golden and crispy!

OTHER FILLINGS…

My versions of this recipe are not healthy, as you will have very much gathered. They are about having fun with food and enjoying food. If you want to make a healthy filling i.e. sweet potato mash, white sauce and bacon with broccoli – there is no reason why you could not do this. You could make bolognaise and pop that in, or chilli (see my chilli recipe) or even meatballs (see my meatball recipe). If you like fish, you could make the white sauce recipe above that I made and then to this add a selection of fish – white fish would work well, or salmon; or you could go very fancy and use some prawns and make a seafood filled pancake! You could make a curry and rice – or use a leftover curry from the night before!? The world is your oyster when it comes to this.

The only fillings you cannot use – or I would advise you not to use – are soups or salads. The first will not hold well as a filling and life could get VERY messy. The latter would be disgusting/wilted once baked, so do tread with a little caution!

If you want to see how Hugh did it with the River Cottage team, you can have a look here. But I think my version is best… as I would!

I’m not French but French Onion soup I am… with very scrummy, very cheesy *CHEESE CROUTONS*

8 May

crutons

From the feedback I have received for my last post in my ‘Living Below the Line’ series, I decided to make a slightly more ‘extravagant’ version of my French Onion Soup, for those of us who would like to indulge a little bit and eat this soup like the French do… with CHEESY CROUTONS.  The best cheese to use for this is a traditional Gruyère cheese, as this has a rich cheesy flavour with a stringy, soft texture (when melted).

When I was in Paris last year, I made sure that I had this soup as a starter or as my lunch each day.  I wanted to see how different restaurants made it and after ordering it for my lunch on the first day, and trying the traditional soup for the first time I was not only delighted, but I was hooked. It was THE most incredible French onion soup I had ever eaten and I have wanted to recreate it for a while now, but haven’t dared in case I did not do it justice.  But, this recipe was amazing and it took me straight back to my first day in Paris.

PREPARATION TIME: 10 minutes

COOKING TIME: 1.5 hours

MAKES: 4 portions

INGREDIENTS:

  • 3 large white onions
  • 1 tbsp olive oil
  • 40g butter 
  • 3 cloves of garlic
  • 2 tsp brown sugar
  • 2.5 pints of boiling hot water
  • 275ml white wine (this is a really important ingredient to get a really authentic tasting soup)
  • 2 beef stock cubes
  • approx. 1 tsp black pepper (or to taste)
  • 1 small ciabatta bread
  • 80g Gruyere cheese

HOW TO MAKE THE SOUP…

Let’s start by preparing the onions.  So, chop in half, peel and then slice.  We are going to make half moons of the onion so that we have large pieces of onion in our soup. Delicious.  The onions are the star of the show after all.

Heat the oil and the butter in a pan until the butter has melted and then add the onions and cook on a high heat.  You will need to keep stirring this and then letting it cook for a minute, stir, cook, stir cook so that the onions do not stick, but just allowing them enough time to soften and caramelise.  Once the edges of the onion are just starting to become golden, like this…

soup 1

.. the onions with the butter and the oil, just becoming golden around the edges.

We can move onto the next stage where we are going to get as much flavour from the onions as we possibly can.  So, we need to pay close attention to the onions as they could burn and if that happens we will have to start again from scratch.  We are going to turn the heat down to low – as low as it will go and allow the onions to cook for a couple of minutes and then stir and repeat.  Ensure you are scraping the bottom of the pan each time you stir to make sure NOTHING is stuck to the bottom.  After half an hour the onions should be golden brown and have reduced to quite a small quantity in the bottom of the pan.  If this is the case you are ready to add the stock.  If not, keep going for another 10 minutes or so.

Now add the 2.5 pints of boiling water, the 275ml of white wine and the 2 beef stock cubes.  Turn the heat up to high and once the stock cubes are dissolved and the soup is at a rolling boil reduce the heat to low and allow it to reduce for 45 minutes.  This will allow the soup to thicken a little as the volume of liquid reduces.

soup 2

The onions have coloured the soup and added a fantastic deep brown/golden colour to the soup. The stock cubes, water, wine and pepper have now been added and we are ready to reduce the soup for 45 minutes.

Whilst the soup reduces, slice the ciabatta bread to create giant croutons – if you are making this soup to serve 4 people I would make 8 croutons, therefore 8 slices of ciabatta, so that everyone gets 2 croutons. Ciabatta bread is the best to use as it is a slightly more hardy bread… if you were to use white sliced bread it would completely disintegrate in the soup and you would be left with crouton mush.

Place these onto a baking tray and grill, until they are just slightly golden.  Turn over and repeat on the other side.  Whilst the croutons are being toasted you can grate approx. 80g of Gruyere cheese.  If you use the smallest grater this will be best as the cheese will melt more quickly.  Once the croutons are toasted remove them from underneath the grill (using your oven gloves) and sprinkle with approx. 10g of cheese on each one.  Place back under the grill until the cheese is melted.

Once you have reduced the soup and it is looking thicker than when you first added the stock, then you are ready to serve the soup.  Use a ladle to spoon the soup out into the bowl and then place 2 croutons in the centre of the bowl.  You are now ready to eat… ENJOY!

crutons

My version of French Onion Soup with Gruyere cheese, CHEESY CROUTONS.

I thought I would take the opportunity to show you a few little snaps from my trip to Paris… and most importantly the French Onion Soup from the *Cafe du Centre* – it was truly incredible.  I hope this recipe inspires you to make this soup.  It is a real treat and not too indulgent if you are watching your waistline.

Cafe Paris French Onion 1 Me ParisLou Paris

…a little less frugal and a lot more indulgent *ROASTED VEG, CHICKPEA & FETA COUSCOUS*

6 May

couscous 1

I love the roasted vegetable couscous recipe I uploaded yesterday, as a potential recipe in my ‘living below the poverty line on £1 a day challenge’, but as I mentioned there are a few things I would do differently if I were not trying to cut corners and make this recipe as cheap as I possibly could.

I understand and appreciate that there are people in our country who are not as fortunate as I perhaps am, and would only just be able to afford my 59p recipe never-mind this slightly more indulgent recipe.  But yesterday I was thinking to myself what the cost of a bottle of water is in my local supermarket (approx. 89p) and what I paid last week for a lemon water drink (£1.95) when I was gasping for a drink in central London and it was all I could find.

I was actually pretty shocked at this and thought if I am paying £1.95 for a drink which lasted me half an hour and simply quenched my thirst, then surely I could spend a little more to make this lunch even more healthy, nutritious and enjoyable whilst still only spending a pound or so a day for my lunches.

I have friends who pop to Pret each day for a sandwich, drink and bag of crisps, this must cost around £7 each day?  And, I know others who pop to our local salad bar at lunch for a £4.50 a day salad.  None of these my budget will allow for, but this recipe with a few additions it will, so by goodness I am going to go all out!  Get ready folks we are about to get a little more jazzy with the couscous…

PREPARATION TIME: 15 minutes

COOKING TIME: 30 minutes

MAKES: 4 portions

COST: £1.07 per portion – which is quite a significant difference to my £0.59 recipe, but it is still much better than buying one drink for £1.95 or lunch for £4.50.  Eating this for lunch for 4 days would be do-able and actually it would make for a cheap lunch, in comparison to what you could be paying for this in a restaurant.

INGREDIENTS:

  • 250g couscous – this costs £1.25 in Tesco’s for 500g, so although you would need to buy the whole bag, you would only need half of it, which would make it 63p . Try to find the whole-wheat version for a slightly healthier version.
  • 1 and a half red peppers – now this cost me 80p per pepper as I bought it from my local Sainsbury’s.  You could shop around for this and get it for a lot cheaper in a local grocery shop or market stall (the bowls of peppers for £1 will get you 3 or 4 peppers). Mine cost me £1.20.
  • 2 red onions – look through all the bags/onions and ensure you get a large one if they are all the same price, this is what I do!  60p
  • 2 courgettes – I bought a packet with 2 courgettes in for £1
  • 1/2 a tin of chickpeas (200g) – I shopped around for these a little and found them at Asda for 62pI think these may be cheaper to buy somewhere like Aldi.  It is much cheaper to buy these dry and soak them yourself, though this will add some extra time to the preparation of this recipe, as they will need to be soaked overnight. So these cost me 36p.
  • 1/2 a lemon – it was 30p for a whole one (again shop around and you will get this cheaper!) 15p
  • 2 cloves of garlic – the bulb was 20p so approx. 2p
  • 1 stock cube – it was £1.09 for 8 stock cubes so this makes it 14p per stock cube
  • 300ml boiling hot water – this one you can have for free as we all have the right to water and I am sure you can make it hot (there has to be some cutting of corners here)
  • 80g of vintage/aged feta cheese – I have choose a vintage version of this as it will have a deeper/stronger flavour and therefore you will need less cheese to get the flavour and consequently it will be slightly healthier.  Feta cheese is quite expensive, but the cheapest I have found was in Waitrose (ummmmm I know!) for £1.69 for 250g, so for this recipe I spent 54p
  • 15 mint leaves – very specific I know, but if you roll these up like a cigar and then finely chop them, they are an excellent flavour enhancer, but too much and we have mint couscous and nothing else.  A bag of mint leaves was 80p, so use about 1/3 of this and it will cost approx. 26p
  • 1 tbsp olive oil – this is a general store cupboard ingredient so we aren’t going to cost this one (as I am also running out of money!)
  • 2 tsp chilli flakes (again a store cupboard ingredient!)
  • 2 tsp paprika (store cupboard ingredient)

HOW TO MAKE THE ROASTED VEGETABLE COUSCOUS…

First we need to make the couscous, so make up the stock using boiling water and dissolving the stock cube in this.  Then weigh out the couscous, place in a large bowl and pour the stock over the top.  Cover with a clean tea towel and place to one side.

Wash the vegetables and then chop them into slices… they can be left quite large at this stage.  Peel the garlic cloves, peel the onion and chop into quarters and leave in its quarters (otherwise it will burn).  Drizzle with 1 tbsp olive oil, 2 tsp chilli flakes and 2 tsp of paprika and rub together to ensure all the ingredients are coated in spices and oil.

couscous 3

Roughly chopped vegetables coated in olive oil, paprika and chilli flakes.

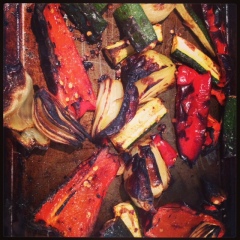
Bake in the oven for 20 minutes until all the vegetables are soft, slightly brown/golden but definitely not burnt.  Allow them to cool, whilst you use a fork to break up the couscous, mix this well and then we can ‘mince’ all of the vegetables.

couscous 4

… beautifully roasted vegetables – even if I do say so myself!

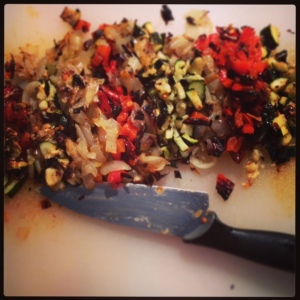
Mincing is a chopping technique, so place all your vegetables (and garlic) onto a chopping board and then, using a large knife ‘rock’ the knife over the top of them in different directions, until all the vegetables are finely diced/minced.  Add these to the couscous.

couscous 5

My roasted vegetables once ‘minced’… look at those fabulous colours. YUM!

Now we are going to make the dressing, so in a small bowl zest 1/2 the lemon, then roll it on your chopping board using the palm of your hand to release the juices.  Chop in half and squeeze the juice of 1/2 a lemon into the bowl.  To this add 1 tbsp olive oil and mix well.  Roll your mint leaves into a cigar shape and then finely chop these, you can use the rocking technique to make them even smaller and then add to the olive oil and lemon mixture. Pour this over the vegetables and the couscous, then open your tin of chickpeas, drain, add to the mix.

Finally crumble your 80g of feta cheese into the couscous, mix well and then we are DONE!  Now you can enjoy this lovely hearty roasted vegetable couscous…

couscous

From humble beginnings to a delicious, nutritious meal with all of our food groups… dairy, carbohydrates, protein, fruit and vegetables; and a little fat/sugars, but good fats from the olive oil. DONE!

Live Below the Line – Part 1: Roasted Veg & Chickpea Couscous

5 May

couscous 2I have been quite inspired this month hearing from friends and colleagues who are embarking on the challenge of living on £1 a day.  My initial thoughts were ‘pah… no way, I love food and I just could not do it’.  And then my mind started wandering and questioning my initial thinking…

… of the foods I make, how much do they actually cost per portion?  If I were to do this would I in effect be ‘dieting’ slightly?  Could this challenge be beneficial to my health?  I may eat more vegetables than I normally do? Other people have to do it, so why can’t I?  Could I help others who are have to live off £1 a day by providing some recipes? … and so it continued.

Having plagued myself with questions about the ‘living below the poverty line challenge’ for the last 2 weeks I have decided it may not be so bad after all and maybe, just maybe I could forgo some meals out with friends.  It would also help me save a little money on food and it would definitely be healthier, as I would not be able to eat very much cheese or cake and would need to use more vegetables and lentils.  So, when cooking dinner at home over the last week I have been pondering some of the more ‘simple’ recipes I make and really enjoy when times are getting slightly harder.  Such as my roasted vegetable couscous salad, pitta bread pizzas, quick pasta dishes and my all time favourite healthy/cheap meal in its self – soup.

I have decided to set myself the challenge of creating some healthy, meat free meals over the next few weeks, so I am going to be collecting a few of my favourite quick, easy and cheap recipes and trying them out, here, with you.  Ultimately some may not work and yes, I will be eating the resultant meal for the next week, but hey… we are living on a budget aren’t we folks?

If this all goes swimmingly and I find some lovely recipes (some will have to be desserts as I cannot live without the odd sweet treat) then I will complete the challenge myself in July and see if it is indeed possible when living in London, trying to be a sociable and seeing friends for drinks/dinner and simply enjoying life.  I think it may well be…

Without further ado, lets have a look at this little ROASTED VEGETABLE COUSCOUS recipe I love…

PREPARATION TIME: 15 minutes

COOKING TIME: 30 minutes

MAKES: 5 portions

COST: 59p per portion (this is quite expensive, more so that I thought when embarking on this challenge… I am a little disappointed).

INGREDIENTS:

  • 250g couscous – this costs £1.25 in Tesco’s for 500g, so although you would need to buy the whole bag, you would only need half of it, which would make it 63p
  • 1 red pepper – now this cost me 80p as I bought it from my local Sainsbury’s.  Part of this challenge is definitely about where we shop, so perhaps we could shop around for this and get it for a lot cheaper in a local grocery shop?
  • 1 red onion – look through all the bags/onions and ensure you get a large one if they are all the same price, this is what I do!  30p
  • 1 courgette – I bought one as the ones it packets all seemed smaller but more expensive, buying items when they are loose is definitely best for the budget, so this cost me 33p
  • 1 tin of chickpeas – I shopped around for these a little and found them at Asda for 62p.  I think these may be cheaper to buy somewhere like Aldi or Liddle.  It is much cheaper to buy these dry and soak them yourself, though this will add some extra time to the preparation of this recipe, as they will need to be soaked overnight.
  • 1/2 a lemon – it was 30p for a whole one (again shop around and you will get this cheaper!) 15p
  • 2 cloves of garlic – the bulb was 20p so approx. 2p
  • 1 stock cube – it was £1.09 for 8 stock cubes so this makes it 14p per stock cube
  • 300ml boiling hot water – this one you can have for free as we all have the right to water and I am sure you can make it hot (there has to be some cutting of corners here)
  • 1 tbsp olive oil – this is a general store cupboard ingredient so we aren’t going to cost this one (as I am also running out of money!)
  • 1 tsp chilli flakes (again a store cupboard ingredient!)

HOW TO MAKE THE ROASTED VEGETABLE COUSCOUS…

First we need to make the couscous, so make up the stock using boiling water and dissolving the stock cube in this.  Then weigh out the couscous, place in a large bowl and pour the stock over the top.  Cover with a clean tea towel and place to one side.

Wash the vegetables and then chop them into slices… they can be left quite large at this stage.  Peel the garlic cloves, peel the onion and chop into quarters and leave in its quarters (otherwise it will burn).  Drizzle with 1 tbsp olive oil, 1tsp chilli flakes and rub together to ensure all the ingredients are coated in chilli and oil.

couscous 3

Roughly chopped vegetables coated in olive oil and chilli flakes.

Bake in the oven for 20 minutes until all the vegetables are soft, slightly brown/golden but definitely not burnt.  Allow them to cool, whilst you use a fork to break up the couscous, mix this well and then we can ‘mince’ all of the vegetables.

couscous 4

… beautifully roasted vegetables – even if I do say so myself!

Mincing is a chopping technique, so place all your vegetables (and garlic) onto a chopping board and then, using a large knife ‘rock’ the knife over the top of them in different directions, until all the vegetables are finely diced/minced.  Add these to the couscous.

couscous 5

My roasted vegetables once ‘minced’… look at those fabulous colours. YUM!

Now we are going to make the dressing, so in a small bowl zest 1/2 the lemon, then roll it on your chopping board using the palm of your hand to release the juices.  Chop in half and squeeze the juice of 1/2 a lemon into the bowl.  To this add 1 tbsp olive oil and mix well.  Pour this over the vegetables and the couscous, then open your tin of chickpeas, drain, add to the salad and we are DONE!  Now you can enjoy this lovely hearty roasted vegetable couscous…

couscous 6

Roasted Vegetable & Chickpea Couscous… DONE!

EVALUATION:

Overall the recipe looks and tastes great.  I am not sure I felt ‘full’ after eating this, but I think that, that is a feeling I will just have to get used to on the £1 a day diet.  If I were making this normally for my lunch/dinner I would probably have a little feta cheese with it (no more than 20g) or I would serve it alongside some chicken/fish (without the chickpeas).  So, it was a little odd eating it couscous alone for my lunch, though the chickpeas bulked the recipe out, filled me up a little more than just the vegetables and couscous would have done and added some much needed protein.  The flavours from the lemon, chilli, garlic and roasted vegetables really made this recipe tasty and delicious.

The overall cost has upset me… 59p per portion really is not good, as that leaves me 41p for the rest of the day.  I would have to ensure my dinner was very cheap (I am thinking a simple soup) and that my breakfast was a porridge without fruit.  I do however think that if I shopped around a little I could make this recipe much cheaper, so tomorrow I am going to pop to a fab little grocery shop near work and see if I can beat this budget.  I will update this recipe in due course.

couscous

I shall see if I can get all these ingredients cheaper and when/if I do, I shall update the recipe costs below.

Recipe one done!  Now… what next…

*MEATBALLS* … inspired by MASTERCHEF, made by ME. Simples.

21 Apr

meatballs 8

I have been away for a little while, doing ‘life admin’, which I agree is absolutely no fun at all, but it has to be done.  I have however continued to bake/cook at every opportunity and have made a range of things which I will share with you over the next few weeks.  Whilst I have been away I have however been watching one of my favourite TV shows… Masterchef.

Masterchef has been back on our TV screens (hoorah!) and I have been avidly watching the new series – is it me or has there been a few dodgy hopefuls?  It left me thinking ‘surely I am better than those people, who don’t even know the difference between pork and lamb?‘… Hummm.  Not too impressed, I must say!

Anyway, I often watch Masterchef and think ‘I would love to make that, if only I could afford XXX ingredients’.  I never can and always think it’s a little unobtainable for me, though I do enjoy viewing the show.  However, this week all was different.  John Torode made meatballs… what!?  Simple, easy and something I liked and could easily get all the ingredients for.  I was inspired.

So, here is what I did and how I did it.  John – they may not be as good as yours, but God loves a trier!

PREPARATION TIME: 15 minutes

COOKING TIME: 15 minutes

MAKES: 40 meatballs (serve 4 per person)

COST:  The meatballs will cost approx. 80p per portion to make and the sauce and pasta will add another 68p to this.  Overall the dish will cost £1.48.

INGREDIENTS:

For the meatballs…

  • 400g pork mince (£3.50)
  • 400g lean beef mince (£4)
  • 1 onion (33p)
  • 2 English breakfast muffins (50p)
  • 6 tsp sage (50p)
  • Black pepper (to taste)

For the pasta & sauce… (serves 4 people)

  • 1 tin chopped tomatoes (89p)
  • 1 tbsp tomato puree (20p)
  • 1 tbsp heinz tomato ketchup (20p)
  • 1 onion (33p)
  • 1 tsp worcestershire sauce (5p)
  • 1 tsp black pepper (5p)
  • 240g wholemeal pasta (£1)

HOW TO MAKE THE DISH…

meatballs 1

Grate the English muffins, to make breadcrumbs.

Some people don’t use breadcrumbs and they make this dish with 100% meat, but I like the texture the breadcrumbs give the meatballs and so does John, so here we go!  If you have a blender then great, you can use this to make the breadcrumbs, so just break the English muffins up into small pieces but into the blender.  If you don’t have a blender (like me) you can use a cheese grater to get the same result… honestly!  (I prefer it to using a blender actually as I hate cleaning the blender!)  So, once you have your breadcrumbs place these to one side.

Finely dice the onion and then (using a tiny bit of olive oil) cook these until they are soft and golden.  Do not let them catch and burn, as this will make the meatballs taste burnt too.  Once the onions are soft add the sage and continue to cook, this will release the flavour from the sage.

Next add the breadcrumbs, to the onions and the sage.  I was also quite surprise when I watched John Torode do this, but as he explained, if you don’t do this (in effect toast the breadcrumbs) then they will give the meatballs an ‘uncooked’ texture i.e. soggy!  So cook the onions, sage and breadcrumbs until they everything is golden.  This will only take about 5 minutes. Again, be careful not to let them burn and keep stirring them in the pan.

Place the pork mince and the beef mince in a large bowl and break up a little.  To this add the onions, sage and breadcrumbs mixture (I added this straight away, if you want to let it cool a little this is fine too, its probably best unless you have asbestos hands!).  Add some black pepper to this too, this will just bring out the flavours.  Add as much as you like… some people don’t like pepper and I do believe that it is an acquired taste. Then mix together well until everything comes together and is evenly distributed.  Interestingly, if you just use pork mince for this recipe then the meatballs will be very dry.  Using the beef with the pork keeps the mixture moist and brings out the ‘meaty’ flavour.  I do agree though, it is a little odd having pork and beef in the same recipe… but hey ho, it tastes great!

The meatballs mixture is now ready to roll (so to speak).  So, you can roll them into small balls.  I like to have smaller meatballs so that they get fully coated in sauce, so make lots of smaller meatballs or fewer larger ones.  This bit is for you to decide!  You could even make mini-meatballs, so that they are about 1cm each… this is what I will be doing next time… just to mix things up a little.

meatballs 7

My meatballs… rolled and ready to be cooked and eaten!

Now it is time to cook the meatballs.  In a large pan (or frying pan) heat a little olive oil and then once this is smoking a little (not spitting) drop about 8 meatballs in (2 portions) and cook these for about 3 minutes, constantly moving them around so that they do not stick and are evenly cooked.  Once they are golden all over remove them from the pan and place to one side.  Repeat this with all the meatballs you want/require.

Now it is time to make the pasta and the sauce.  Make the tomato sauce first, so that this can reduce whilst you cook the pasta.  Dice the onion and then fry this in a little tiny bit of olive oil until it is golden.  To this add a tin of chopped tomatoes, the tomato puree and the tomato ketchup.  I know that this is a little bit of a cheat, but if you don’t use this, you will need to add a little bit of sugar so it’s just the same but more tomato-y.  (This is one of my friends little cheats and it works a treat!)  To this you can add the Worcestershire sauce and a little black pepper and then you sealed meatballs, leave this to reduce and also to allow the meatballs to cook through and take on the tomato sauce flavour.  Whilst this cooks we can make the pasta.

meatballs 4

The sauce with the sealed (not cooked) meatballs, happily reducing whilst my pasta cooks.

So, boil some water and pour into a pan.  The standard portion size is about 60g of raw pasta per person, so measure this out and then place into the boiling water.  Unless you have quick cook pasta, this will take about 10 – 12 minutes to cook… just the right amount of time for your sauce to come together and thicken.

Once everything is cooked… the sauce has reduced, the pasta is cooked and drained; place the pasta in with the meatballs and sauce and mix well.  Serve and ensure that everyone gets the same number of meatballs!  Its really important to ensure everything gets mixed together as otherwise you end up with dry pasta… and this is just not what the Italians would do.  So ensure all the pasta gets coated with the sauce before you serve.  Sprinkle with some parmesan (if you like, I do) and enjoy with a glass of red wine!  DELICIOUS.

meatballs 5

The final dish, with everything coated in the sauce served! DONE!


Saturday night, SALMON & chinese NOoDles delight… *THE GIRL(S) DONE GOOD*

7 Apr

ImageEver feel like you want a yummy dinner, wine and a night in with the girls?

I did this weekend. I couldn’t face donning my make-up, faffing with my hair curlers and tottering around in my heels…  So, we decided to stay in and invite a couple of friends over for dinner.

We started by hitting the recipe books, to create our masterpiece and came up with our own little salmon and noodle recipes ready for dinner… it was absolutely delicious and our experimenting paid off!

Here is what we did and how we kept the costs down.  The best Saturday night in I’ve had for a long time.  THANKS LADIES!

PREPARATION TIME:  5 minutes

COOKING TIME: 12 minutes

MAKES: 4 portions

COST:  £1.17 per portion (maybe add another 30p per portion for all the other store cupboard ingredients.  This doesn’t include wine… but you can choose that based on your level of spare cash!)

INGREDIENTS:

For the salmon marinade…

  • 4 salmon fillets (£6.67 – in a 3 for £10 offer)
  • 2 tsp olive oil
  • 2 tsp soya sauce
  • 2 tsp honey
  • 1 tsp cayenne pepper
  • 1 tsp chinese 5 spice

For the noodles…

  • 300g brown rice vermicelli noodles (£1.50)
  • 3 tbsp sesame oil
  • 3 tbsp soya sauce
  • 1 tbsp honey
  • 1 tsp chilli flakes
  • 1 tsp chinese 5 spice

Serve with…

  • 1/2 bag spinach (50p)
  • 1 tsp nutmeg
  • 4 tbsp pomegrate (75p)
  • 1 lemon (30p)

… and wine…

We served this with a cheeky bottle of ‘Gavi di Gavi’ which is my absolutely favourite white wine and it went beautifully with our Salmon and Noodle creation… I can verify this as it slipped down nicely!  I am not a wine buff (not at all), but I know a little about wine, having worked in a fab wine bar in London and Gavi di Gavi is a beautifully crisp Italian wine.  I like it because its delicate, lemon flavour is extremely fresh and refreshing – I think this is why it complimented our dinner so well as we had hints of lemon and pomegranate (fruity notes).  Just delicious!

HOW WE DID IT…

First my housemate Leanne marinaded the salmon in the olive oil, soya sauce, honey and spices and popped this in the fridge for an hour.  Then she wrapped the salmon fillets in a tin foil parcels (2 fillets per parcel) and baked them in the oven for 12 minutes.

Whilst the salmon cooked I prepared the brown rice noodles (I used brown rice noodles to add a little extra fibre and goodness to the dish – I did share this little fact with my dinner guests in typical ‘Gemma’ style).  I soaked the noodles in a large bowl of boiling water for 10 minutes.  Whilst these soaked, I heated the sesame oil, honey, soya sauce and spices in a small pan.  Then I drained the now cooked/soaked noodles and tossed them in the pan with the seasoning.  Once they were coated and re-heated through I served the noodles.

Meanwhile Leanne wilted the spinach leaves.  She rinsed them first, then poured boiling water over them, whilst they sat in a colander.  These were then placed in a large pan whilst 1/2 a lemon was squeezed onto them and 1 tsp of nutmeg sprinkled on top.  Leanne gently stired these together and heated them just slightly.  These were then served onto the plate, the tbsp of pomegrate seeds was sprinked on the top and then the now cooked Salmon was carefully sat on top of the spinach and pomegranate.

The whole meal was served with a small wedge of lemon and a glass of our delicious Gavi di Gavi.

salmon 3

This is our finished result… presentation is everything! How to impress your dinner guests by Gemma & Leanne…

So, next week when you don’t fancy going out, don’t.  Stay in, download my recipe and get creative.  You could even add some herbs/spices of your own or maybe use lime instead of lemon and see what happens.  ENJOY!

It’s chilly… So let’s eat CHILLI… yum!

18 Mar

chilli 2Recently it has been very cold outside, and to be honest it doesn’t seem like it is going to get any better soon.  I heard the weather forecaster this morning telling the world it was going to SNOW in the North of England.  So, I thought that I should give you all my chilli recipe, to stave off the winter chills.

I used to prepare this chilli and make a relatively normal amount, so I could freeze the left overs.  I soon realised that rather than making 6 portions I may as well make a HUGE batch and then freeze the rest.  Therefore, my chilli has become an epic chilli making day.  I literally set aside a day to prepare this and then I can portion it up and freeze it for easy meals when I come home from work.

I am going to give you the recipe for my EPIC CHILLI and if you feel that it is too much, you can reduce the portion sizes.  However, the cost will increase per portion if you do this.

Here we go chilli people… this long winter will not beat us if we have chilli in our tummies!

PREPARATION TIME: 30 minutes

COOKING TIME: 45 minutes

MAKES: 20 portions

COST PER PORTION: approx. £0.67

I think this is really really good value for money (especially when you are purchasing fresh, lean beef mince).  I have used Sainsbury’s to buy my ingredients as it is most local to me, but do shop around try to buy your tins/cartons when they are on offer, as you can reduce the 67p even more.  Also, if you live near a market go there to buy your peppers, courgettes and onions as they will be significantly cheaper.

INGREDIENTS

  • 1kg lean beef mince (I buy 2x 500g packets when they are on offer.  These will cost approx. £6.00)
  • 1 tbsp olive oil 10p
  • 3 onions £1
  • 2 small courgettes £1
  • 2 large dark red peppers (I always feel like these have more vitamins and minerals as they are so deep in colour) £1.60
  • 2x 400g tins of kidney beans (In water, not chilli sauce, unless you really want that one!) £1.40
  • 3x packets of tomato passata (Don’t buy the ones in the glass jars they are a lot more expensive) £1.60
  • 300ml water
  • 4 tsp chilli powder 10p
  • 3 tsp black pepper 10p
  • 1 tsp worcestershire sauce 5p
  • 1 tsp salt (I do apologise, but it does need it…) 1p

You are also going to need some freezer bags… shop around for this, get the smallest ones you can.  I estimate these will cost 2p each so add this to the cost of the recipe to.

HOW TO MAKE THE CHILLI…

Lets do this in stages to make it more manageable…

1. Prep your area:

I warn you, your kitchen is going to erupt into kitchen mayhem.  So be prepared!  Lets start by getting out our pans.  I have 3 pans – we have a pan set, so I use these.  If you have 2 large pans this would be best.  Ensure you choose pans that have lids, we will need these! Get out your chopping board and a sharp knife.  Then get a bowl – this is going to be for all the rubbish from the onions (the skin and the root), the tops and tails of the courgette, the pith and seeds from the red pepper.

2. Prep and cook your vegetables:

We are going to prepare the onions first, so chop the top off, chop them in half and then peel them.  Leave the root intact, this will stop your eyes stinging anywhere near as much.  Now dice the onion so that it is quite fine.  If you like chunky vegetables then feel free to leave the onion quite large, I like everything small.  Do as you please!

Place the oil into one of the pans and heat until it is warm, not spitting.  Place the onions in and leave to cook until golden.  You will need to stir them every now and again.  Whatever you do, do not let them burn. (This should take 10 mins).

Whilst the onions are cooking wash your courgettes and red peppers.  Dice these finely (about the same size as the onions, however you did those) and then place to one side.  Chopping a red pepper is really easy – when you know how.  Place it down on your board with the stalk facing upwards.  Then chop down the edges of the pepper, so you end up with all the pith and the seeds attached to the stalk.  You can then chop off the rest of the base and the rest of the red pepper from the top… taaaa daaa!  Then you can chop the red pepper nice and finely… do this flesh side up, shiny side down – much easier.  The knife will glide.

Add the courgette and red pepper to the cooked onions.  We want to cook these until they just start to loose their colour and become soft.  This should take about 7 minutes.  Ensure the pan is on a medium heat.

At this stage I would add the salt, pepper and chilli and then leave to cook out for another 2 – 3 minutes.

3. Brown the beef mince…

In the second pan place the lean beef mince, turn on the heat and cook.  You want to keep ‘chopping’ this with the spoon you are using to stir, so that it all breaks up into little pieces.  Cook this until it is golden.  If you can do this at the same time as the onions, peppers and courgettes then great.  If not that is fine, but ensure you turn the heat off on the onion etc. whilst the beef cooks.  Browning the beef mince will take 10 – 15 minutes.

4. Share between the pans…

This is where the cooker starts to get messy!  Well mine does!  I now have veg in one pan, beef in the other – so either get a large bowl, throw everything in and then split between the 2 pans, so that they both contain the same, or add everything to one pan and split.  Its up to you, but now you need to ensure that both the pans are equal in veg:meat.

5. It’s time to get saucy!

The main ingredients for our chilli are now done.  Well done!  Now we need to make the sauce.  Add 1 and a half cartons of passata to each pan.  Add 1/2 the water to each pan too.  Now measure and add 2 tsp of chilli to each pan (you can always add more later if it is not ‘hot’ enough – but you cannot take it away, so be careful!).  Drain the tins of kidney beans, so there is no liquid and give them a good wash.  I find the best way to do this is to put everything into a sieve and then run water over the beans.  Add half to one pan and half to the other.  Shake approx. 1/2 a teaspoon of Worcestershire sauce to each pan of chilli annd then give them a good stir to combine all the ingredients.

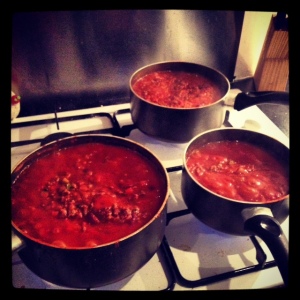
It is now time to leave the chilli to cook.  So add the pan lids, bring the contents to the boil and then reduce the heat so that the chilli is just bubbling (simmering).  We are going to let this cook for half an hour.  Set an alarm for 10 mins and then stir the chilli, set for 10 mins and stir the chilli etc.  This will stop the chilli sticking to the bottom of the pan and burning.

pans

Here is my chilli cooking away… I split everything between 3 pans, which makes the maths complicated!
NB. My kitchen doesn’t seem to messy for ‘chilli day’.

You know the chilli is ready when it has changed colour and become a deep red/purple – as per the pictures.  The liquid should have evaporated off and the chilli should have reduced a little.  If it does not look like this, remove the lids, and leave for another 10 – 15 minutes.

I then allow all my chilli to cool down – with the lids on.  This takes a few hours.  Once it is cooled I place all my chilli in a very large bowl add 1 large cup of water, mix well and then its portioning up time!

6. Portioning up!

I get out my scales and my freezer bags and then I begin to portion up.  I am a Nutritionist and have worked for a well known supermarket, so I know that the approximate portion size for meat and sauce is about 200g.  I therefore weigh out 200g of chilli into each freezer bag.  I tie/roll and then place them in the freezer and I am done.

When I come in from work (generally on a Monday after a long day) I get one portion of chilli out the freezer and defrost it for 6 minutes in the microwave.  I then cook it in the microwave for 4 minutes, 30 seconds and then serve it with wild rice and a dollop of sour cream.  If I was more prepared I may leave the chilli to defrost in the fridge overnight then cook in a pan on the hob – but Monday holds an element of laziness (for me) so unfortunately I resign myself to the microwave.

HAPPY CHILLI MAKING PEOPLE.

Chicken Tikka Cheater… Taking a leaf out of Delia’s Book

27 Feb

Well Delia cheated, so why can’t I!?

It’s not something I am going to do often, however when it has been a long day and you have been on your feet is all you really desire is a yummy dinner that doesn’t take an age to cook.  I know this as well as the next person.  So tonight it was short-cut time.

I popped to Marks & Spencer’s and I bought their ‘Tikka Masala Sauce’.  I love their sauce range as they are seemingly the most authentic (I haven’t tried too many other types to be honest), but I know that M&S make simple, good, honest food and I like their ethos, so that is where my sauce came from.  I am not an M&S food snob – I promise.

So, what to add to the sauce… chicken is the obvious, but what about a vegetable – sweet potato?  I decided to take the plunge and add it in; and I will be doing it again.  It was delicious as the tomato-y sauce really went well with the sweetness of the potato – I am not sure I even really needed the chicken.  Maybe I will go 100% veggie next time, though I may need even more vegetables!  Here is how to do it folks…

PREPARATION TIME: 10 minutes

COOKING TIME: 20 minutes

MAKES: 4 portions

COST PER PORTION: £1.16

INGREDIENTS

  • 1 Jar of M&S Tikka Sauce – it cost me £.179
  • 1 Sweet Potato – it cost me 33p
  • 1 Onion – it cost me 33p
  • 1 Large Chicken Breast  – it cost me £1.70 (This was from my local butchers and included the fillet, so it was huge! Most supermarkets remove this and sell it on as a ‘chicken fillet’ when really it belonged to your chicken breast.)
  • 250g Wild Rice – it cost me £51p

HOW TO DO IT…

Like I said before, I don’t normally cheat like this and use a jar sauce.  I believe that food should be cooked from scratch and be healthy and nutritious, but if you have had a bad day and are going to be naughty – do it but do it well and as healthily and tastily as you can.

So, peel and chop the sweet potato into very small cubes – I recommend 1cm cubes.  Then pop these into a small pan and add boiling water.  As these are so small they are going to take about 10 minutes to cook.  Do not over cook them so that they are dropping and making a sweet potato soup in your pan!

Chop the onion into a small dice and pop this into a pre-heated frying pan.  Leave this to cook, moving it around occasionally.  You want the onion to be very soft and slightly golden – not burnt, so keep the heat quite low.

Whilst the onion cooks away, chop your chicken breast up into approx. 1cm pieces too.  I say to do this quite small as I like to ensure all my ingredients are similar sizes and therefore I get a mouthful of rice, chicken, sweet potato and sauce.  I am not one of those people who eats all the separate elements of my dinner individually i.e. all my veg, all my protein then all my carbs!  No!  You want a little bit of everything in each mouthful.

Now the onions are soft, add the chicken and cook until golden and cooked through.  This should take about 7 minutes.  Whilst this is cooking I would measure out the wild rice, put this in a pan and cover with boiling water and then pop the lid on.  This will take 15 minutes, so your chicken should be cooked when the rice is half cooked.

The sweet potatoes will be ready to, so drain these and add these to the chicken and onions.  It is time for the sauce!  POP open your jar and pour into the frying pan with your lovely ingredients.  Fill the jar 1/3 full, place the lid back on, give it a shake and then pour this into the frying pan to.  We are now going to cook this until it reduces a little and thickens up and coats all of your chicken and sweet potatoes.

Time is up, everything should now be ready.  Drain the rice, serve and place a large dollop of your meat and sauce into the middle!  Pick up your fork and go… you deserve it!


How did you have yours!?

13 Feb

20130213-082300.jpg

This year I got myself all prepared and ready for pancake day… my goodness I was excited… SHROVE TUESDAY!  YES!  This year I was organised… for the wrong week, which is a #fail.

So… I did have plans last night so I could not join in with the pancake fun, so my pancake day will be tonight.  Some of you may have gone for it and had pancakes last night, some of you may not have… if not, why not try this recipe tonight?  It is the best one I have found/use and I believe that to get a good pancake it is all in the eggs…

Preparation Time: 3 minutes

Cooking Time: 4 minutes

Eating Time: 3 minutes per pancake (unless you are a hoover!)

Ingredients:

  • 200g plain flour
  • pinch salt
  • 2 large eggs
  • 200ml semi-skimmed milk
  • 75ml water
  • Butter (for the pan)

Optional Additions to the Ingredients:

This is the vital part of the pancake… HOW WILL YOU HAVE YOURS?  So, what toppings do you fancy.  For me it is always lemon and sugar, but you could have banana and nutella, orange and cinnamon, a jam (raspberry, strawberry, blackcurrant), you could go very healthy and have yoghurt and berries.  You choose, buy these and then get ready to make the batter.

How to make the batter..As per my previous note – it is all in the eggs!  So, you ideally need organic free-range eggs and they must be fresh, I repeat, they must be fresh!  Crack your egg in a mug and if the white is watery and runny then it is not that fresh.  If you have just bought the eggs that day and you do this test you should have quite a firm egg with no watery bits.  If your egg is watery it is ok, you can still use it and it will not make you ill; but you may not get the best/tastiest pancakes possible.  Sorry.

So first you need to sieve the flour and the pinch of salt into a bowl.

Next, make a well in the centre of the flour and then pour your egg from the mug unto the middle – the well – and then repeat with the second egg.  Separating the eggs out into mugs first before you put them into the mixture just allows you to check they are ok and smell ok.  My mummy taught me to do this as a little girl, so it is something I always, always do.  (Thanks Sally!)

Pour the milk and the water into the well too.

Begin to mix – slowly!  So, place your metal spoon (or fork) into the centre of the well with the wet ingredients and being to whisk in a scrambling motion.  Do this slowly and you will notice that your wet ingredients start to pull in the flour.  Keep doing this until nearly all/most of the flour has come into the wet mixture.  Then and only then can you start to fold in the rest of the flour.  This is the ONLY way to avoid getting huge flour lumps in your batter, so please do this bit slowly and carefully.  Put some love into your pancakes people!

Now put a little knob of butter into your pan and heat it up – gently.  Once the butter has melted and is just starting to smoke (not burning and bubbling) place a ladle of mixture into the pan (if you have a small pan use half a ladle) and then pick the pan up and move the batter around so it covers the base.  Do not drag the mixture with a spatuala.

Allow this to cook for 2 minutes on one side (it should be starting to come away from the pan at the edges, telling you that it is cooked) then FLIP IT and cook the other side.  You will know when it has cooked as it will not be doughy any more and will have little brown splodges/freckles on it.

The first pancake for me is always a test and sets my pan up for more pancakes, so ensure you have a low heat – disregard pancake one – it is probably very ugly and perfect your skills the second time around.

Go for it!  This batter should make 8 to 10 pancakes! ENJOY!

Ps. As per the picture I will be having mine with lemon and sugar… but I also have a little treat up my sleeve which I will be giving to you all tomorrow – if it works!