Tag Archives: #family

YORKSHIRE PUDDINGS… a Sunday Roast is not a Sunday Roast without them. Aunt Bessie eat your heart out!

14 Jul

20130628-073606.jpgAs per the title of this post, a Sunday Roast is not a Sunday Roast without YORKSHIRE PUDDINGS… and many of them.  Don’t get me wrong, I do love going out for a Sunday Lunch, however I only ever get ONE Yorkshire Pudding and I find that very very upsetting.

When I was a little girl Yorkshire Puddings were the thing we always argued every Sunday… and that was not just me and my little sister.  That was my Mum and Dad too!  My mum would make a ‘batch’ of yorkshire puddings.  Sometimes this would be 12 and as we got older it would be 16.  Then when Mark joined our family (my wee sisters other half) we started making 20.  So… ‘3 each’ or ‘4 each’ was the rule shouted as they were brought into the dining room.  During the meal we would ask each other ‘how many have you had?’ and we would systematically go around the table.  Sometimes LIES were told.  This would cause chaos… especially if you had simply and innocently forgotten how many you had (cough cough).

So… we grew up with Mum making Yorkshire Puddings every Sunday and therefore my sister and I are adept at making Yorkshire’s.  I therefore find it very ODD that people are shocked and amazed when I whip up a batch and don’t rely on Aunt Bessie’s fake, thin and skimpy puddings.  OH NO.  If I did that Mum would disown me, and rightly so.

In fact neither my sister nor I use a recipe, so this is going to be quite hard for me to write!  But here we go…

PREPARATION TIME: 10 minutes

COOKING TIME: 15 minutes

MAKES: 12 Yorkshire Puddings

INGREDIENTS:

  • 4 heaped tablespoons of plain flour
  • A pinch of salt
  • 1 egg
  • Milk (enough to make a smooth batter)
  • Vegetable oil / lard /butter

HOW TO MAKE THE PUDDINGS…

First things first and possibly the MOST important stage.  Get out the Yorkshire Pudding tin… which is the one that is smaller than a muffin tin and is used to bake buns not cupcakes.  (I hope this makes sense!)  To each well in the Yorkshire Pudding tin add 1/2 a teaspoon of oil/butter/lard.  I prefer to use vegetable oil as I don’t think it adds a taste to the puddings.  Now place this in a hot oven – so heat the oven to 200 degrees (gas mark 5) and then place in the tray with the oil.  You want to leave this to ensure that the oil is very hot, which should take about 10 minutes.  Whilst this heats up, lets make the batter…

In a medium sized bowl (or if you are like me I find it easier to use a measuring jug, as it will allow me to pour the mixture out neatly) place the 4 heaped tablespoons of plain flour in and add to that the pinch of salt (but only a pinch).

Mix together the salt and flour and then make a well in the centre – a hole!  (I say this to the children I work with and they look at me like I am crazy!!)  It simply means make a space in the centre.  Into here add the egg (obviously crack it open!) and then add a good glug of milk.  If you want some help here, about 6 tablespoons of milk – but it doesn’t matter if its slightly more or less at this stage.

Now, using a fork start whisking the egg and milk (only) in the centre.  Keep going and you will notice that gradually the flour starts to stick and come into the mix, keep going and going until a lot of the flour has come into the milk/egg now you should be starting to get a think paste… don’t let it get too thick as so far you will have avoided lumps.

Add a dash of milk and continue to mix.  Add another dash of milk and repeat.  You can now bring in the rest of the flour by mixing around the sides of the bowl and add another dash of milk.

The batter for Yorkshire Puddings and pancakes is the same, the only difference is the thickness.  For pancakes you want a very thin consistency, for puddings you want a thick batter.  So in between the consistency of houmous and pancake batter.  (Hummm this is hard to explain).  So keep adding milk until you get the batter to this consistency and whisk well to ensure there are no lumps.

Now your oil should be hot, so take the tin out of the oven (using a glove) and begin pouring in the batter.  You want to fill each well up until it is approx. two thirds full – this will allow room for rising.  You also need to act very quickly as you need the oil to be hot as the batter hits it.  So, fill each well and then get them puddings straight into the oven.

Leave for 15 minutes and DO NOT OPEN THE OVEN.  If you do they could drop and then you won’t get the impressive rise.  After 15 minutes open the oven and have a peak.  If they are golden they are ready.  I like mine a little doughy/heavy so I take them out after 15 minutes.  If you like them lighter in weight and darker in colour then leave them for another 5 minutes.

Add them to your roast dinner after declaring ‘2 each’ or ‘3 each’ and enjoy!  Any leftover batter (if you are cooking for one or two) could be used as pancakes… you just need to add more milk.  ENJOY and please… don’t fight.

20130628-073635.jpg

My finished YORKSHIRE PUDDINGS… GOBBLE GOBBLE!

ABC, 1..2..3… with SIXTEEN SiZzLinG Sausages, sizzling in a pan…

21 May

photo‘Why am I calling this an ABC recipe?’ I hear you ask… well… this recipe was sent to me by Anna Buttery and it’s a Casserole!  But making this recipe is also as simple as ABC, 1… 2… 3.  The ingredient list looks lengthy and potentially quite ambitious, but I assure you it isn’t really.  It is all about having the confidence to ‘have a go’ and even if you don’t do everything to the letter, it doesn’t matter as with something as simple as a casserole you can’t really fail.

Follow these simple steps and make a delicious, hearty dinner that you will be extremely proud to show off to your friends and family.  I made it this weekend after Anna recommended it to me, as my parents were visiting London and I had them and 2 hungry house-mates to feed, so the 5 of us sat down to dinner and really enjoyed this meal.  The herbs, wine and balsamic vinegar gave the casserole a fabulous flavour and I found that the recipe wasn’t too expensive make, so I could happily feed everyone for under £10.

I bought some garlic bread and baking potatoes (which I roasted in the oven at the same time as the casserole) as my carbohydrate and they complimented the dish well.  On finishing the meal I still had 4 sausages left, so I had 2 meals for work too.  Just sublime!

PREPARATION TIME: 20 minutes (including cooking the sausages)

COOKING TIME: 1.5 hours

MAKES: 8 portions (to feed your family, or to freeze)

COST PER PORTION: 91p… this gives everyone 2 sausages, lots of beans and casserole sauce and if you then add a carbohydrate to this you want to add an extra 25p per person for a potato or some garlic bread or maybe even some rice.

INGREDIENTS:

  • 16 Cumberland sausages – I bought 3 packs from Sainsbury’s for £5 and used 2 packs, using these offers is a great way to save money – £3.34
  • 1 tin chopped tomatoes – 69p
  • 1 bag Sainsbury’s cherry tomatoes – £1
  • 200g tomato passata – 24p
  • 3 gloves of chopped/crushed garlic – 4p
  • 4 whole garlic cloves – 5p
  • 2 large onions (red or white)
  • 2 rosemary sprigs – from my garden so free to me!
  • 1tbsp fresh thyme – also from my garden so free to me!
  • 1 can of cannellini beans – 69p
  • 1 can of baked beans – any brand will do, I had a spare tin of Heinz, Branston are cheaper and have more flavour but the Sainsbury’s own are the cheapest, so the choice is yours – 70p
  • 150ml Red wine – only use this if you have a leftover bottle lying around, I did so this went in.  If I hadn’t I would not have opened a bottle for this, as I just cannot afford to.  For this reason, and because we are using up leftovers this is pretty much a freebie!
  • 4 tbsp balsamic vinegar – 30p
  • 1 red chilli with seeds or 3 tsp chilli powder – this is a store cupboard ingredient, or if you have a chilli plant in the garden it’s pretty much free!
  • 1 tsp paprika – this is a store cupboard ingredient, so we don’t need to include this in the costings.
  • 1 Kallo stock cube – beef or pork is fine, use Kallo as they are organic, have less salt and more flavour, cheaper stock cubes mean you are paying for expensive salt! – 12p
  • 2 stalks of celery – 10p
  • 100 ml water – if you do not use the red wine increase this to 200ml

HOW TO MAKE THIS DELICIOUS CASSEROLE…

So, the first thing to do is to cook the sausages! Lets get them going in the frying pan, turning them a quarter turn ever couple of minutes so that they become nice and golden/brown all over.  This should take about 10 minutes.  Once done remove them from the pan and place them on a plate to rest.  Do not throw all the ‘sausage juice’ left in the pan away, as this is where most of our flavour is going to come from.

IMG_5413

…my sixteen sizzling sausages, sizzling in the pan!

Next, peel and chop the onions in to 8ths and separate a little.  Throw these into the pan with all the sausage juice and cook until golden.  To this add the little pieces of celery, the chopped/crushed garlic and then the pressed, whole garlic cloves in their skin. Cook for 3 – 4 minutes and then add the chilli, the chopped up rosemary, the thyme (leaves only, not the twig bits as these will get stuck in your teeth).  Cut the cherry tomatoes in halves and then add to the pan and leave for another 5 minutes.  Now add the balsamic vinegar and the red wine and allow to cook for a further 5 minutes.  IMG_5414

Finally add the stock cube, the tin of chopped tomatoes, the baked beans and the cannellini beans.  I would also add the water at this stage, as in the oven the sauce will reduce somewhat and you don’t want a dry casserole!

IMG_5415

Stack the sausages, as per the picture in your casserole dish.  This will allow the sauce to get in between the sausages and allow everything to mingle nicely together.  To this add the casserole sauce, and if there are any sausage juices on the plate where the sausages have been resting, put these into the casserole and mix a little.  It should look a little bit like this now…

IMG_5416

Cover this with tin-foil and bake in the oven at 180 degrees for an hour.  If you want a jacket potato wrap this in foil and put this in the oven now too. For the last 30 minutes remove the tinfoil, reduce the heat in the oven to about 140/150 degrees and allow some of the liquid to evaporate off.  The sauce will become all sticky and gooey in this time and become extra tasty.  Now you are ready to serve – with the carbohydrate of your choice.  YUMMY.

photo-3

The final casserole… all scrummy and ready to eat. It may look like an ordinary casserole, but believe me it’s a taste sensation. THANK YOU ANNA BUTTERY xxx

The ORANGE-IEST, Lemon Cake you ever did see…

11 Mar
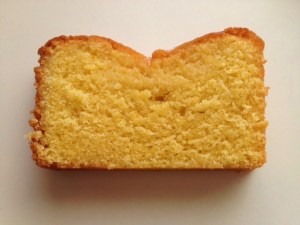
My orange coloured Lemon Cake.  It was phenomenal :)

My orange coloured Lemon Cake. It was phenomenal!

My mother and I made the lemon cake together yesterday for mothers day, using the eggs we collected from the chickens.  We then devoured it with a large mug of tea!

I just wanted to take the opportunity to share the end result of this cake with you here.  It was fantastically orange (due to the eggs we used from our chickens) and it was beautifully lemon-y.  It really was a taste sensation!  So, if you are doing any of your own baking at home and can afford to buy organic, free-range eggs do – you will not regret it, I promise.

Do you want to make my lemon cake?  If so, you can find the link on the right of the page under ‘A little Lemon Cake for my Mother Hen’, or simply click on this link!

If you make one of your own do send some pictures over to me, or send me a TWEET @gemsfoodgems.

Just a few of the chickens for the eggs for my Lemon Cake... Thanks!

Just a few of the chickens for the eggs for my Lemon Cake… Thanks!

Aunty Olive’s, Aunty Olive Biscuits… A treat if ever I have had one!

6 Mar

photo (1)

Heading home, back to the North of England, from London and thinking about its associations and my childhood brings me straight to food…  The main thing I think about when I am about to embark on my journey home will no doubt include all the meals I can have!  My mother will cook a certain selection of meals that we will agree on in advance, that will take me straight back to my childhood.  These include:

  • Fish, Chips and Mushy Peas (the nothern bit, they don’t do mushy peas down south)
  • Steak Pies with lashings and lashings of gravy, with mashed potato
  • Mince and Dumplings also known as a ‘Swimmer’
  • Hairy Chicken (this one you will have to ask my sister about; but it was simply something she noticed about chicken wings when she was little and used to enquire about… we don’t eat feathered chickens just because we are northern!)
  • A ‘sit around tea’ – which consists of sandwiches and a buffet style meal, only to be had when the whole family comes over
  • Cakes – my mum always has the cake tin stocked up, always.  When we were little people would come over to our house just to have my mum’s cake – not to play with me! Hehe!  So what cakes… parkin cakes, rock buns, chocolate chip muffins, bakewell tarts, and last but by no means least Aunty Olive Biscuits.

‘An Aunty Olive Biscuit?’ I hear you saying with a puzzled face!  Yes… that is correct, and you are not silly for not knowing what the heck they are.  Basically we had a fake aunty (it feels bad saying this, but you know what I mean!) who lived next door, with Uncle Harry and my little sister and I doted on them both.  We would be at her house 50% of the time we were at our own, and we would always be given homemade biscuits.  They were full of golden syrup and oats and my sister and I adored them.  Eventually my mother got a little bit sick of hearing about ‘Aunty Olive Biscuits’ and so she asked for the recipe and have made them ever since – to my families total delight!

They are a favourite of my mum’s, dad’s my sister’s and now my housemates.  I make them every so often and I know that they will be gone quicker than any cake.  The are special as they remind me of my late Aunty Olive and all the happy memories I had growing up.  So here we are, and do give a nod to Aunty Olive when you eat them…

PREPARATION TIME: 10 minutes

COOKING TIME: 10 – 15 minutes

MAKES: 12 biscuits

INGREDIENTS

  • 4oz (115g) margarine
  • 3oz (85g) caster sugar
  • 4oz (115g) golden syrup
  • 4oz (115g) self raising flour
  • 1 tsp bicarbonate of soda
  • 6oz (170g) porridge oats / rolled oats

HOW TO MAKE THE LITTLE TREASURES…

First things first, as with any recipe you need to prepare your oven (180 degrees C or gas mark 4) and then prepare your baking trays with baking paper.  I would use two trays, as from this mixture you will make approx. 12 biscuits.

In a small pan melt the margarine.  You don’t want this bubbling, boiling and then burning, so do this very gently on a low heat.  To this you are going to add the golden syrup, which is what gives them their gorgeous golden glow.  So, this is quite challenging to do, as you know syrup is sticky.  Place the syrup on the scales, zero/tare them so that they are on zero, and now we are going to remove the required amount (115g).  Use a dessert spoon, place it into the syrup…. ummmmm… now lift it out and start twirling the spoon, so that any ‘extra’ sryup will fall off and fall back into the tin.  Once you have no trail behind whip this over to your pan (on a low heat), stop twirling and scrape the syrup off.  Repeat this until you have taken 4oz (115g) from the tin.  The scales will read -4oz or -115g.

(Well done if you have done this without getting syrup all over your workspace – you deserve to lick the spoon!)

Heat the syrup and the marg together until they have come together and then place to one side.  You can now weigh out all the other (dry) ingredients into your mixing bowl.

To the dry ingredients add the warm syrup/marg solution and then bring together to make a dough, using your spoon (not the syrup one if you licked it!).  The dough will be firm and stiff, which is exactly right, as we are making biscuits!

Take a small handful of the oat/syrup biscuit dough and roll this into a ball.  Place this ball onto the baking sheet and repeat, until there is no dough left in the bowl.

Bake in the oven for 10 minutes.  They now need to be patted down, so do this using a spatula – not your hands – and then bake for a further 5 minutes.  They should be a beautiful golden colour now and smelling divine.  Leave them to cool and then indulge!

It is as simple as that.  Thank you Aunty Olive.